This article has an update on used streaming software. You can read about it here
Recently I discovered I still had a Raspberry Pi Zero (without WiFi) in my drawer. Since I already wanted to create a bird-cam some time ago (since I saw one online but too expensive) I decided it would be worth a try to build one using this Pi Zero board.
So I already had the Pi. Other equipment I needed:
- Power adapter
- micro USB charging cable
- Camera
- SD card (8 Gb)
- Wifi dongle
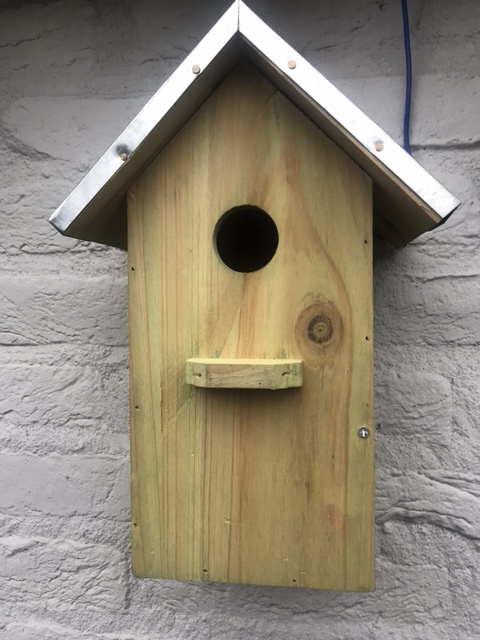
- Bird box
The whole set, if I count the stuff already possessed, costed me around about €30,-.
|
|
|
My Pi Zero is 1.3 version. It has no WiFi but it does have the required camera connection. Since I have a USB Wifi dongle (same drawer) the WiFi problem could but solved but unfortunately the Pi Zero only has micro USB connectors. Need to find a fix for that.
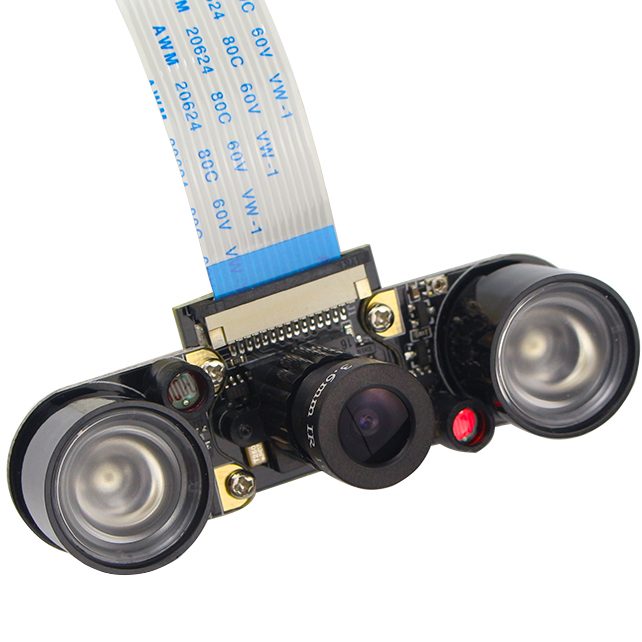
For the camera I decided to order a night vision camera on AliExpress. Of course that would delay my project but it’s mid winter so I have some time.. One thing to remember that the Pi Zero has a different camera connector as the normal Raspberry Pi’s. So a specific zero cable is required. The camera comes with adjustable focus and 2 attachable Infrared Leds. it is using a OV5647 sensor has F1.8 aperture and is fully compatible with the Pi. The camera order costed me € 12,- including shipping
Attaching a normal USB connector
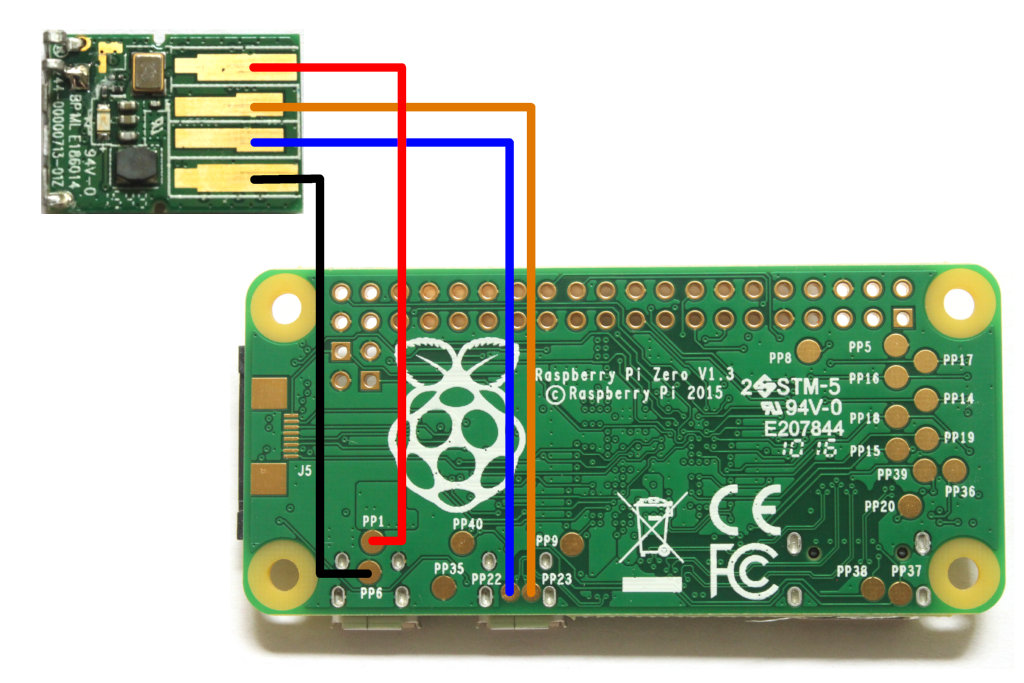
Back to my first challenge: I had a Raspberry Pi Zero that lacks all kind of standard connection methods.
No WiFi, no Ethernet and only micro USB connections. Since I did not want to buy a new one I decided to modify it and just solder a normal USB connector on it.Not really complicated, you can find plenty of information on that on the internet. A micro-USB to USB cable is also a possibility but since I only have limited space in the bird box (and the cable was not available when I was working on it) I chose this solution.
The Power Points (PP) are available for that on the back and you just need to connect PP1 to +5V, PP6 to Ground, PP22 to Data + and PP23 to Data – as shown in picture so I won’t go into more detail on that.
By the way, if you still have to buy one I’d advice to buy the Raspberry Pi Zero W. It has integrated WiFi which makes it a lot easier.
Headless Raspbian installation
I’m using the official OS of the Raspberry Pi Foundation which is Raspbian. No specific reason for that and I’m already using it for other Pi’s I have. Download the Lite version as the Desktop version has a lot of unnecessary overhead for this project.
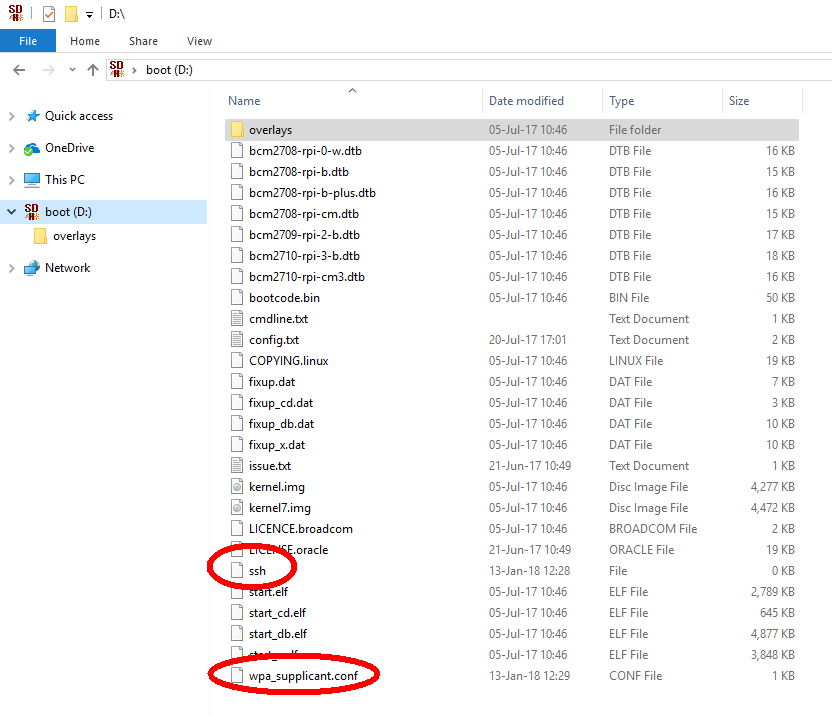
Since I don’t have any means to connect my monitor and/or keyboard I’m using the headless installation. After writing the Raspbian image to SD card (using Rufus or Win32DiskImager I installed the latest Stretch Lite version) the boot partition is accessible in Windows also as it is a FAT32 partition.
Enable SSH
To enable SSH by default just copy an empty file names ‘ssh’ (no extension) to this partition.
Preconfigure WiFi
Create a file named ‘wpa_supplicant.conf’ in this partition and add your network details in there as below example at SSID and psk:
country=NL
ctrl_interface=DIR=/var/run/wpa_supplicant GROUP=netdev
update_config=1

network={
         key_mgmt=WPA-PSK
         ssid="MySSID"
         psk="12AB34CD56EF"
        }
Eject your SD-card and boot your Pi after inserting the SD-card. Give it a few minutes since Raspbian needs to create the file system and some other stuff. After figuring out the IP address from your modem you can connect to your Pi using SSH. I usually use Putty on Windows or just the terminal from my Mac. If you don’t know yet: default user is pi and default password is raspberry
After logging in on your newly installed OS start raspi-config to change things like hostname, default timezone etc.
Important is to enable the camera interface in ‘Interfacing Options’, ‘Camera’ which is default off.
Connecting the camera
Much quicker as expected I received the camera in perfect order (2 weeks). It comes with a small acryl stand that is not really needed but for testing purposes it’s useful. All the screws are there and it comes with 3 camera flat cables of which one is suitable for the Pi zero. After assembling the 2 IR Leds and connecting it to the Pi it is instantly detectable by your pi using the command (Note: the camera interface must be enabled using raspi-config. See above):
supported=1 detected=1
|
|
|
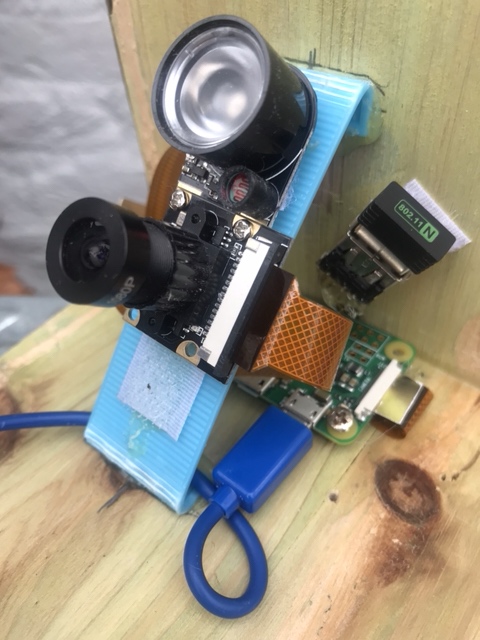

Although the camera comes with 2 IR Leds at some point I removed one. For some reason my Pi became unstable when attaching both.
Choosing your software
The first software tried was RPI Cam web interface. Since this software provides capturing, motion detection and recording it appeared perfect for this project. Installation is easy and pretty straight forward. So far so good but after running the software I noticed a few things
- Exposure not as expected
I couldn’t get a good exposure.. Pictures were dark and I needed to go through a lot of settings to get some kind of nice image - Motion detection
When activating motion detection the image instantly turned black and the camera needed to adjust itself again. It cause motion detection to get in a loop since also when recording started or stopped the image needed to adjust exposure again. - Interface
Couldn’t help it but I hoped it to be a better user interface. Especially when there are more motion files available it is not easy to search. - Processor load
This was too much for my Pi Zero as it turned slow and the motion and capturing caused the processor to be running at high load continuously. Using the web interface just got too slow
I also regularly discovered the whole process stopped or the Pi crashed. I thought it was due to the high load but later I figured out it could have been a different issue. If I attached only one of the IR lights the camera would remain stable and since one IR Led was enough for such a small box I left out the second one.
I also tried motionEye both as software as motionEyeOS. That didn’t give much improvement. Most issues remained. Kerberos.io seemed to be performing a bit better still not as expected.
After these exercises I realized that motion detection would probably be a bit too much for the Pi Zero. Since I already have ZoneMinder running for a camera I thought to use this also for monitoring activity. Only a good video stream would be sufficient.. The previous installs did provide that so after looking further I got to MJPG-streamer. More specifically to a forked version of that by Jackson Liam. That version also has a plugin for raspberry camera and compatible camera’s which should bring down the load.
Update
After updating ZoneMinder to a newer version that also supports h264 streaming and storing I moved over to different software and installed UV4L. You can read about it here
Installing MJPG-streamer
Installing MJPG-streamer requires a few libraries to be installed. I’m running these commands from the home directory of my Pi using the default user pi.
 # Making sure your system is up to date
sudo apt update && sudo apt upgrade
# Installing necessary libraries etc.
sudo apt install libjpeg8-dev imagemagick libv4l-dev uvcdynctrl git cmake
# Cloning from git source
git clone https://github.com/jacksonliam/mjpg-streamer.git
cd mjpg-streamer/mjpg-streamer-experimental
# Compile the streamer
make USE_LIBV4L2=true clean all
# Add user pi (that's my default user) to the video group
sudo usermod -aG video pi
After installation you need to load an extra module to the kernel. That’s the part needed for the camera to be functioning
sudo modprobe bcm2835-v4l2
Now it’s time to start your streaming video using below command. Note that some parameters are add to set the resolution down to 1296 x 972 instead of the original resolution.
./mjpg_streamer -i 'input_uvc.so -d /dev/video0 -r 1296x972 -f 15' -o 'output_http.so -w ./www'
Note that you’ll get some errors here. The reason for that is that there still are some parameters cannot be used. There is special driver for use with the raspberry camera named input_raspicam.so. I tried that too and although it does seem to function I did have some problems using that. Low frame rate and not being able to test with some parameters were some them. If you want to try use below command.
./mjpg_streamer -i 'input_raspicam.so -x 1296 -y 972' -o 'output_http.so -w ./www'
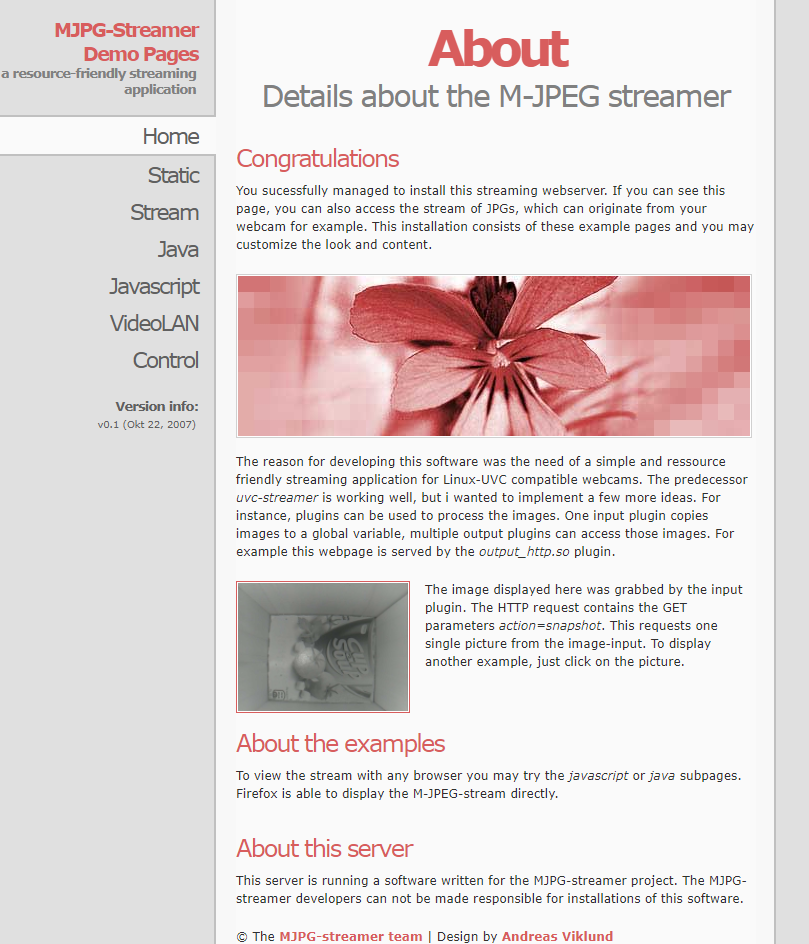 The nice thing on MJPG-streamer is that it starts a web-server on your Pi also (it’s using the output_http plugin). So you can now browse to you Pi Zero using http://<pi-zero IP address>:8080/
In this interface you should see your camera and you have the possibility to check information on how to use it. Very useful also is the ‘Control’ menu. Although it will you some errors when starting you have the possibility to test and change parameters regarding image quality like Brightness, Contrast, Exposure, Color correction and so on. My experience was that by default the settings where doing fine.
Note: If you are using the input_raspicam.so plugin you will not have the control options available
If you’re done testing just press Ctrl-C to interrupt the streaming.
Starting MJPG-streamer automatically
By starting the command manually as above your streamer will run as long as you do not terminate it or when your console session closes. I wanted to start the streamer automatically at boot time and created a short script in my home directory for that. I decided not to go for the complete service installing but just starting a script on startup by adding it to /etc/rc.local.
startstreaming.sh script in your home directory:
#!/bin/sh # This script starts the streaming service # modprobe can also be added to /etc/modules sudo modprobe bcm2835-v4l2 # change to correct dir.., need to change this cd /home/pi/mjpg-streamer/mjpg-streamer-experimental # some tests and the final command being used although input_uvc returns errors (although running) ./mjpg_streamer -i 'input_uvc.so -d /dev/video0 -r 1296x972 -f 15' -o 'output_http.so -w ./www' &amp;amp;
Adding executable rights to the script
Modified /etc/rc.local and added the last line
#!/bin/sh -e
#
# rc.local
#
# This script is executed at the end of each multiuser runlevel.
# Make sure that the script will "exit 0" on success or any other
# value on error.
#
# In order to enable or disable this script just change the execution
# bits.
#
# By default this script does nothing.

# Print the IP address
_IP=$(hostname -I) || true
if [ "$_IP" ]; then
  printf "My IP address is %s\n" "$_IP"
fi

/home/pi/startstreaming.sh
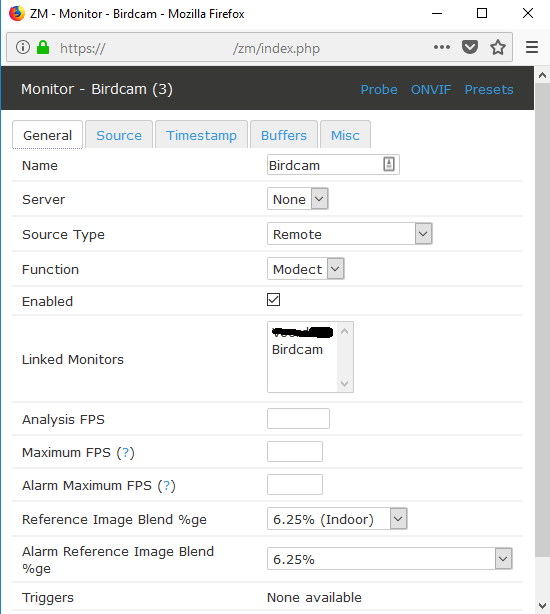
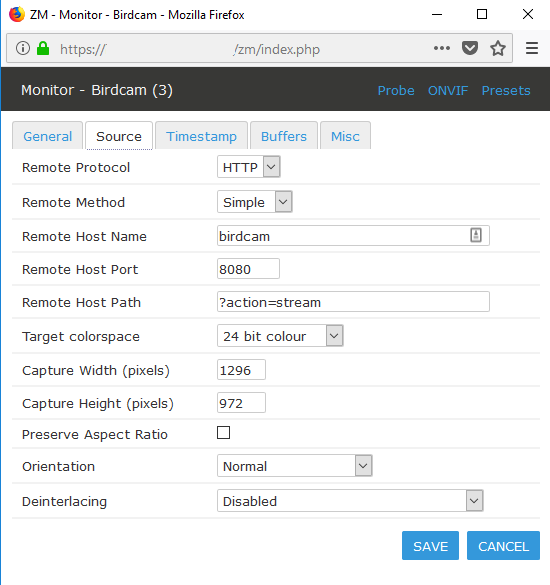
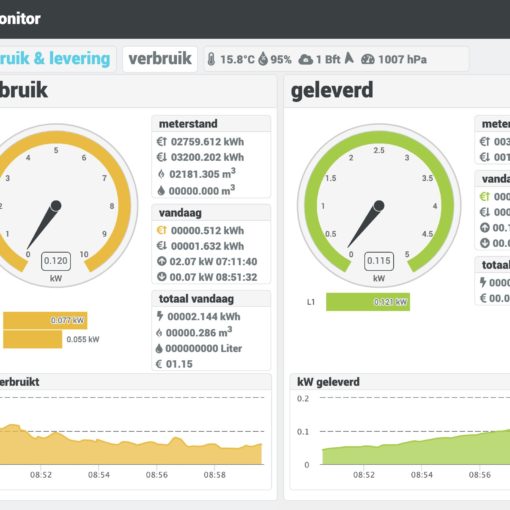
Adding your stream to ZoneMinder
Now that we have a stream available we can start integrating in ZoneMinder. In the ZoneMinder console add a new camera. Add a name and set Source Type to ‘Remote’ in the General tab. In the Source tab set Remote Protocol to ‘HTTP’ and Remote Method to ‘Simple’. Enter the host name or IP address in the Remote Host Name field and enter 8080 as Remote Host Port. For the Remote Host Path enter ‘?action=stream’ to get the stream. Set the Capture Width and Height to the values of your stream. In above example 1296 x 972.
That should do the job and you can continue setting the other required parameters for your stream. On the bottom of the nest box is a Cup-a-Soup carton to make it easier to adjust the focus of the camera.
|
|
|
|
|
|

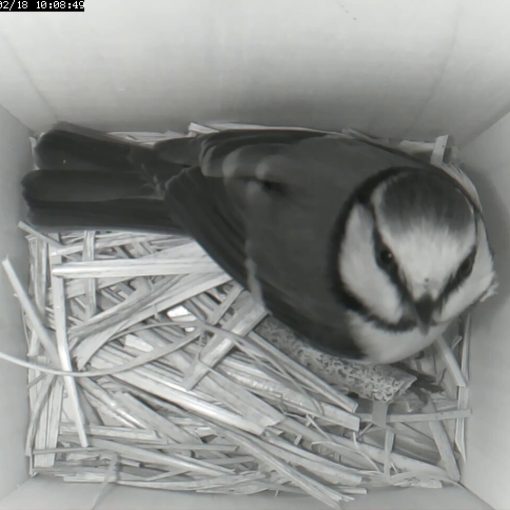
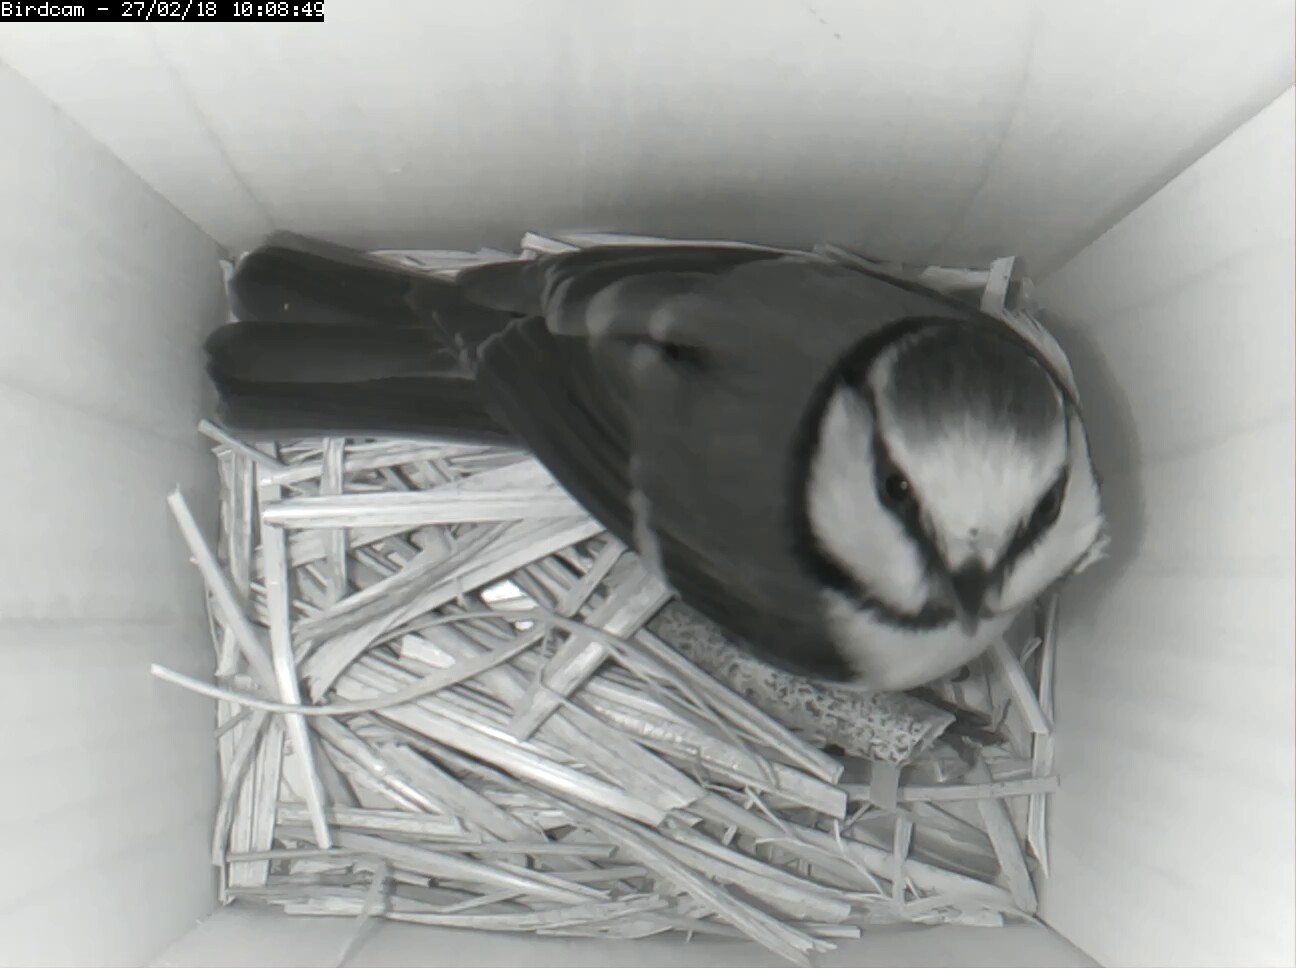
Update: first visit
A few days after I positioned the bird box at its final position I got a visitor checking out a possible new home. A great tit inspected the box for a few seconds.
