A docker-based DSMR reader
This project is describing the porting of the P1-Monitor software running on Raspberry Pi to an image for running P1 monitor to be able to run it on docker or Kubernetes servers. The original software is maintained from p1-monitor.nl – Slimme meter monitor.
For those new to this subject, this software is as monitor for smart energy meters/slimme meters using the P1 port (a sort of serial port) using the DSMR 3 protocol. A data package, called a telegram, is sent every 10 seconds (interval may differ) that contains data on usage on electricity and gas. You can use that data to get real-time insight in your usage. P1 monitor is software that visualises the data using graphs en retain the information in databases.
Since I’m running a Linux server already I didn’t want to start using a dedicated Raspberry Pi board for monitoring my smart meter. But the software provided by ZTATZ is only available as a complete system image running on a Raspberry Pi. That’s why I started converting the software to an image version suitable for running on any system with the help of docker, docker compose, kubernetes or other orchestrator.
One other big benefit that I experienced is that I do not need to go through the extensive update process of exporting and importing data since everything is stored outside the container. Unless changes will be made to the databases of course but in that case you still use the export/import procedures.
The image is available on Docker hub and I’m using GitHub to maintain the repository. The image version has the same functionality as the full version (although some options related to Operating System are not being used of course). Docker hub also holds the versions for other architectures so you can also run the container on ARM etc (such as Raspberry Pi) devices.
Note: This image is NOT intended to be exposed to the internet without additional security measures (that’s also the case for the original p1monitor version). Although password protection is available for the settings page any information may be exposed as not all information is fully protected. Use this information in your internal network only or add additional configuration options as adding a reverse proxy or CloudFlare tunnel.
Table of Contents
Install docker
For the ones not familiar with containers: Start with installing docker server version on your system. Using docker-compose it is easier to start, read and maintain a configuration. You can also install Docker Desktop but if you will not be using Docker for anything else its overkill. If you rather would like the use the Docker command-line options directly or integrate into a cluster examples can be found below.
Docker script
To start with docker compose create a new directory and create a file named docker-compose.yml. Copy the contents of below docker compose file example to that file and save it. (Note you keep the indentation with spaces!) If needed you can modify it using your own parameters such as the location of the data (in the example script in the subdirectory alldata). That subdirectory is for creating persistence; if the container is recreated or an update is available all data is preserved since it is being stored outside the container. If your server is rebooted the container will automatically be restarted.
Next you start your containerised P1-Monitor using the docker compose up -d command. A local network will be created and the container will be started in the background. After a short while (initially the image needs to be downloaded from Docker hub) the P1-Monitor will be available on configured port. In below example it will be running on standard port 80 but you can easily change that by modifying the port mapping parameter from 80:80 to for instance 81:80 if you want the container to be available at port 8.
Similar is the devices section; it is mapping your local serial device to /dev/ttyUSB0 in the container. This is the device where you connected your smart meter.
Docker compose file example
services:
  p1monitor:
    hostname: p1mon
    image: mclaassen/p1mon
    #stop_grace_period: 1m
    ports:
      - 80:80
    volumes:
      - ./alldata/data:/p1mon/data
      - ./alldata/usbdisk:/p1mon/mnt/usb
      - ./alldata/mnt/ramdisk:/p1mon/mnt/ramdisk
    tmpfs:
      - /run
      - /tmp
    devices:
      - /dev/ttyUSB0:/dev/ttyUSB0
    restart: unless-stopped
Parameters
The docker-compose file supports below parameters:
- ports
mapping van ports from outside to inside. If you want to use port 81 to access your instance use the setting 81:80 - volumes
these are the directories being used to store the persistent data. In the example above subdirectory alldata will be automatically created (if started for the first time) and all collected information will be stored here. - image
this is the image that will be downloaded and where the container is spawned from - devices
mapping of your external to internal serial device. Adjustment is only needed in case you are using a different USB port on your host system. - stop_grace_period
this option can be added to allow the stop script to be fully completed before the container is terminated. Without this parameter the container will be terminated in 10 seconds. In 10 seconds the complete stop is not executed (resulting e.g. that ramdisk data is not copied to data directory resulting in up to 15 minutes of data loss). The stop scripts from p1monitor need more time to complete and ramdisk data will be written to data directory. A period of approx. 1 minute should be sufficient.
When using the stop_grace_period the container will be terminated when the stop script is completed or the defined period is timed out.
Note: setting a too short period can cause databases to get corrupted! (if grace period ends during data backup)
Upgrade to latest version
If a new image is released (usually shortly after the original P1-Monitor software has been updated) you can stop the container instance using the docker compose down command. Do not delete any files but issue the command docker compose pull to retrieve the latest image from Docker hub. The pull command will download the latest image as specified in the docker-compose file. After the pull is complete start the container again using the docker compose up command. All historic data will be reused (if you do not change the docker-compose configuration file of course).
Note that new container versions will not automatically update at stopping and starting. The pull action must be performed to retrieve a new version of the image.
Migrate from original P1-Monitor instance
To migrate from the original P1-Monitor (the one you had running on the dedicated Raspberry Pi) it is easiest to export the data. To do so use the menu Settings (Instellingen) and select In- Export. In your new instance use the same menu to import the extracted data again.
Additional docker compose parameters
Additional parameters can be passed to the container using the option environment. As example in above configuration adding the available parameters as shown below.
services:
  p1monitor:
    hostname: p1mon
    image: mclaassen/p1mon
    ports:
      - 80:80
    volumes:
      - ./alldata/data:/p1mon/data
      - ./alldata/usbdisk:/p1mon/mnt/usb
      - ./alldata/mnt/ramdisk:/p1mon/mnt/ramdisk
    tmpfs:
       - /run
       - /tmp
    devices:
       - /dev/ttyUSB0:/dev/ttyUSB0
    environment:
       - CRONTAB=/p1mon/data/crontab.txt
       - PROXYPATH=p1mon
       - SOCAT_CONF="-T60 pty,link=/dev/ttyUSB1,rawer,group-late=dialout,mode=660 tcp:192.168.1.200:5523,forever,interval=30"
    restart: unless-stopped
CRONTAB
Reference to a file containing additional crontab configuration settings. These are loaded in cron at start of the container. Note that used volumes must be mapped correctly.
PROXYPATH
Since I would like access to the data also when not at home I added a reverse proxy option. By adding parameter PROXYPATH=p1mon the configuration in the container is adjusted so you can use the subdirectory p1mon as a path in your url. Your outside url would be something like https://myhomenetwork.nl/p1mon.
Don’t forget to protect your reverse proxy (e.g. username/password) as the P1-Monitor version is not build to be internet facing.
SOCAT_CONF
Some time back a few users requested to have socat implemented in the image for remote reading of the P1 data to a virtual serial port. The example parameter above is reading information from a remote serial reader at 192.168.1.200 port 5523. When starting the container port ttyUSB1 is created and will be used in P1Monitor to read the data. Logging is available in /var/log/socat.log. Please adjust the configuration as needed.
Depending on the remote device you’re using socat parameters may differ. Check the information from the supplier (or software vendor) for the correct parameters. Users have noted for instance that they needed to use raw or raw,echo 0 instead of rawer and modify group-late to group to get the connection up.
Note that the devices section is obsolete when using socat as the script is creating a virtual serial port itself.
GPIOZERO_PIN, PIGPIO_ADDR
Selecting pigpio as pinfactory for gpiozero allows using remote gpio, for example on a different raspberry. This is especially useful when the container is running on a host that is not location where you want to use the gpio, for example to measure watermeter pulses. Adding GPIOZERO_PIN_FACTORY=pigpio and PIGPIO_ADDR=<somehost> to the docker-compose file is sufficient to allow p1monitor to use the gpios of a remote raspberry. The remote raspberry has to run the pigpiod.service, which is available in the pigpio raspbian/debian package.
Accessing GPIO ports
To get access for the GPIO pins on Raspberry Pi devices (for instance to read water meter information), add below modifications to your docker-compose script. Some users reported to have the privileged: true parameter added to the p1monitor section (just below the image tag) to get access to the GPIO ports.
services:
  p1monitor:
    hostname: p1mon
    image: mclaassen/p1mon
    ports:
      - 80:80
    volumes:
      - ./alldata/data:/p1mon/data
      - ./alldata/usbdisk:/p1mon/mnt/usb
      - ./alldata/mnt/ramdisk:/p1mon/mnt/ramdisk
      - /sys:/sys
    tmpfs:
      - /run
      - /tmp
    devices:
      - /dev/ttyUSB0:/dev/ttyUSB0
      - /dev/gpiomem:/dev/gpiomem
    restart: unless-stopped
Using a ramdisk
The original software of P1 Monitor is using a ramdisk for writing to the databases. Reason is to avoid to many write actions to the SD cards (as they can become corrupted or something). Every now and then data from ramdisk is written to the filesystem. When running on a Linux server that is not a real issue as the file IO is not that much. If you still want to use a ramdisk you can use below modification in the docker-compose file. Remove the ramdisk from the volumes section and add it to the tmpfs section as shown below:
services:
  p1monitor:
    hostname: p1mon
    image: mclaassen/p1mon
    ports:
      - 81:80
    volumes:
      - ./alldata/data:/p1mon/data
      - ./alldata/usbdisk:/p1mon/mnt/usb
    tmpfs:
      - /run
      - /tmp
      - /p1mon/mnt/ramdisk
    devices:
      - "/dev/ttyUSB0:/dev/ttyUSB0"
    restart: unless-stopped
Storing logfiles outside container
When using the default configuration the logfiles are stored inside the container and visible via the P1-Monitor user interface or when logging into the container. If you want to have direct access to your logfiles you can store them outside the container by adding a volume such as ./alldata/log:/var/log/p1monitor in the volumes section.
Using docker with command-line options
Don’t want to use docker-compose? Of course you can also use the standard Docker command-line options. As noted earlier, more difficult to read but same functionality. This example, based on the first docker-compose example from above, will create a detached container named p1monitor listening on external http port 81, mapping /dev/ttyUSB0 to the same internal device and using/storing data in /home/user/alldata. You can modify and use below shell script to start using docker:
extport=81
datadir=/home/user/alldata
ttydev=/dev/ttyS0

docker run -d -p $extport:80\
       	-h p1mon\
        --name=p1monitor\
       	--tmpfs /tmp\
       	--tmpfs /run\
       	-v $datadir/data:/p1mon/data\
       	-v $datadir/usbdisk:/p1mon/mnt/usb\
       	-v $datadir/mnt/ramdisk:/p1mon/mnt/ramdisk\
       	--device $ttydev:/dev/ttyUSB0\
       	--restart=unless-stopped\
       	mclaassen/p1mon
Running in Kubernetes variants
Installation in a Kubernetes variant requires some specific configuration settings. Check page Running P1-Monitor in a Kubernetes environment for more information.
Version information
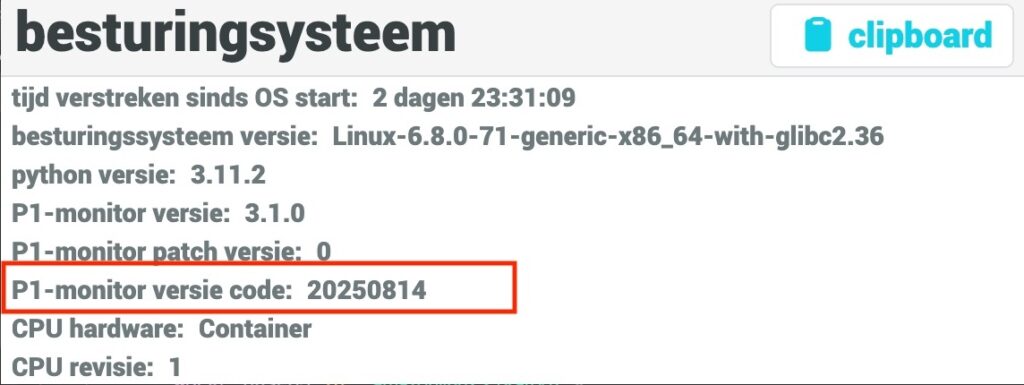
Which version do I have?
Since version 2.4 the version of the image is synchronised with the original ZTATZ versions. On a regular basis the image will be rebuild to fix (new) vulnerabilities. You can recognise your version based on the date field in the Info screen (The icon with the capital i)
Versions
This is the list of changes for the different container versions. the latest tag (if you omit the tag latest will be used) will take you to the newest version. New patch versions (such as 3.3.0.x) are not updated in the list anymore. The image is regularly updated and contains vulnerability updates and patches from the original software.
- 4.0.0
Updated to latest version 4.0.0 - 3.3.0
Updated to latest version 3.3.0 - 3.2.0
Updated to latest version 3.2.0 - 3.1.0f
Added P1monitor Patch 2 - 3.1.0e
Fixed backup issue after restarting container - 3.1.0d
Added P1monitor Patch 1 - 3.1.0c
Patched vulnerabilities - 3.1.0b
Fixed issue with statistics - 3.1.0a
Updated to latest version 3.1.0. - 3.0.1
Updated to latest version 3.0.1. When updating to this version delete session.txt file - 2.4.3
Updated to latest version up till patch 5 - 2.4.2a
Updated to released patch 1 - 2.4.2
Update to latest released version 2.4.2 - 2.4.1b
Fixing GPIO access for ARM devices - 2.4.1a
Updates and latest ‘jaarrekening’ 1.1 added - 2.4.1
Update to latest released version 2.4.1 - 2.4.0f
Fixed incompatible encryption library causing passwords not being stored - 2.4.0e
Fixed MQTT backward compatibility - 2.4.0d
Update base image to latest version of OS - 2.4.0c
Small fixes and updated vulnerabilities - 2.4.0b
Fix included for timezones and fixed vulnerabilities - 2.4.0a
Fix included for phase scrolling - 2.4.0
Update to latest released version 2.4.0 - 2.3.0a
Socat improvements and updates to latest patches - 2.3.0
Update to latest released version 2.3.0 - 2.2.0d
Applied patch 3 - 2.2.0c
Applied patch 2, fixed issues on cron after restart - 2.2.0
Update to latest released version 2.2.0 (integrated dynamic prices) - 2.1.0c
Several fixes, updates on vulnerabilities and added support for dynamic energy prices - 2.1.0b
Several fixes, updates on vulnerabilities and added support for pigpio (Using gpio remotely) - 2.1.0a
Socat updates, p1monitor log files rotation option - 2.1.0
Update to latest released version 2.1.0, additional crontab lines and logrotation of nginx logfiles - 2.0.0
Update to latest released version 2.0.0 - 1.7.0d
Fixed critical PHP vulnerabilities and minor changes - 1.7.0c
Fixed armv7 support - 1.7.0b
Updated base image to latest version, added stop_grace_period support, fixed vulnerabilities and cleaned up scripts, no support for arm7 devices anymore - 1.7.0a
Fixed issue where new installations could have a read-only configuration database - 1.7.0
Minor changes and updated to latest released version 1.7.0 - 1.6.0
Updates to latest released version 1.6.0 - 1.5.0d
Fixed issue with rights on data directory and updated base image - 1.5.0c
Fix issues related to ARM devices and GPIO port assignments - 1.5.0b
Fixed minor issues, automated DISABLECPUTEMP variable (obsolete now) - 1.5.0a
Updated system, completed socat support - 1.5.0
Updates to latest released version 1.5.0 - 1.4.1b
Changed to running as p1mon, fixed issues, updated vulnerable packages - 1.4.1a
Fixed issue tariff status as described by author - 1.4.1
Based on the 1.4.1 image of ZTATZ. Also added reverse proxy capability - 1.4.0
Based on the withdrawn image of ZTATZ. Fixed 1 second issue. Image was withdrawn by the original author but due to the nature of docker container most bugs are not applicable here. - 1.3.1d
Fixed temperature error in VM using environment variable. Modified cron - 1.3.1c
Fixed import/export functions as well as missing ping utility - 1.3.1b
added health check function. Container will show health status and restart on failure - 1.3.1a
Updates fixing some vulnerabilities in python packages and dpkg - 1.3.1
Update to latest released version 1.3.1 - 1.3.0
Update to latest released version 1.3.0 - 1.2.0
Initial released version 1.2.0
More information
For more information on P1-Monitor such as latest updates, news and forum take a look at ZTATZ, GitHub, P1Monitor forum en op Docker Hub

145 gedachten over “P1 Monitor docker image for smart meters”
Ik zie mijn reactie niet meer staan, maar de login, bij instellingen, binnen de laatste nieuwe P1 versie 3.0.1 werkt niet meer, alsof het password incorrect is. Ik draai het op ubuntu. Kan ik dat zelf aanpassen, en hoe dan. Bij de laatste versie tabel staat een opmerking om session.txt te verwijderen, maar waar vind ik die?
Er is in versie 3.0.1 iets veranderd mbt de versleuteling van dat password inderdaad. Als je de session.txt in de data directory wist (en indien aanwezig ook op de mbt/randisk folder) kun je het wachtwoord opnieuw instellen
Gebruik met veel plezier deze P1 docker image op mijn ubuntu servertje een Intel NUC. Nooit problemen gehad. Alleen de nieuwste versie, 3.0.1 geloof ik, geeft het probleem dat ik niet kan inloggen in het P1 scherm waar je alle instellingen kan doen, o.a. tarieven etc. Inlog werkt niet. Terug naar de vorige versie 2.3.4.6., dan werkt het weer.
Vandaag een update uitgevoerd 2.4.3 in docker compose. Maar bij controle is versie nog steeds 2.4.2a
Deze update staat nog niet onder de latest tag. Zie ook https://forum.p1mon.nl/viewtopic.php?p=4912#p4912
Hi Marcel
gisteren weer een update gedraaid , iphone app alles ok, maar edge en brave browser geven an access denied, enig idee ?
Dat zegt me zo niks en heb dat ok zelf nog niet gezien maar als je iphone app ok geeft zal het geheel wel draaien. Probeer eens http://
http heeft niet gewerkt, clean install, backup terug en nu draait ie weer, thx !
Hello Marcel,
First: great appreciation for the excellent work you do on the P1 docker!
My P1 docker is running on a raspberry pi 3b. I have a water-meter linked to GPIO 20. After upgrading to version 2.4.0d, P1 stopped reading the pulses, yet the water-meter was fully functional. Downgrading to version 2.4.0c solved the issue. Has this been resolved in the version 2.4.0.e and onwards?
Thanks Kees, so with version 2.4.0d I introduced an updated base layer and at forum.p1mon.nl I requested people to check if GPIO was still functioning but got now response.
Could you try, in a 2.4.0d+ version to remove the rpi-lgpio lib and check the result? (sudo pip3 uninstall –break-system-packages rpi-lgpio) Let’s continue conversation at https://forum.p1mon.nl/viewtopic.php?t=779
Hoi Marcel
Will do so. May take a day or so.
I will continue the thread at https://forum.p1mon.nl/viewtopic.php?t=779
Hoi Marcel
Will do as you suggest, but it may take a day or two.
I continue the thread at https://forum.p1mon.nl/viewtopic.php?t=779
This 2.4.0f version works fine Thanks
You have pushed the 2.4.0e image to docker to solve the mqtt 2.0 connection. I have tried the image but could mot connect to the broker. Reverted back to the ‘c’ image which worked correct.
The updated base layer of 2.4.0d+ not only caused MQTT version becoming incompatible (fixed in 2.4.0e) but also an incompatibility in an updated encryption library causing passwords being stored incorrectly. 2.4.0f has a fix for the latter issue so please try if that solves your issues.
paho-mqtt is in version 2.0 and needs correctrion with extra parameters the 2.4.0d image breaks mqtt
Should be fixed in latest version
Goedemorgen ,
Na een stroomstoring waarbij in korte tijd spanning aan en uit is gegaan is mijn Odroid HC1 server gecrasht, ben nu weer bezig alles te installeren maar op de een of andere manier krijg ik het niet meer stabiel, niet alleen is de communicatie met de server zeer traag, ook de P1 verbinding met de server is niet constant, het is alsof deze in slaap valt
version: ‘3.8’
services:
p1monitor:
hostname: p1mon
image: mclaassen/p1mon:2.2.0b
ports:
– 81:80
volumes:
– /DATA/P1mon/data:/p1mon/data
– /DATA/P1mon/usb:/p1mon/mnt/usb
– /DATA/P1mon/ramdisk:/p1mon/mnt/ramdisk
tmpfs:
– /run
– /tmp
devices:
– /dev/ttyUSB0:/dev/ttyUSB0
restart: unless-stopped
Aan de compose configuratie lijkt me niets mis. Wat bedoel je met ‘communicatie naar server traag’? En de P1 verbinding met de server? Die laatste leest gewoon de seriele poort uit. Heb je al eens naar je server load gekeken en naar je docker load? (docker stats)
Beste Marcel
Bedankt voor je reactie…
Mijn processor load was gebruikelijk laag, het benaderen van P1m via Ip duurde erg lang en de P1 connectie met de meter lag er telkens uit….
Omdat openmediavault een iets andere docker setup heeft vertrouwde ik dit niet, ik was altijd portainer gewend
Hoe dan ook kreeg ik het niet meer voor elkaar
Later begon ik aan mijn 1Tb HDD te twijfelen en die eens vervangen door een SSD
Het probleem lijkt nu opgelost, het schrijven van en naar de HDD moet de oorzaak geweest zijn
Loopt al weer 12h netjes
Zoek nu alleen een manier om de oude backup data terug te zetten, de knop functie werkt volgens mij niet
Ik weet niet precies hoe je een backup hebt gemaakt maar in principe zou alles moeten werken. Je kunt bovendien altijd nog gewoon alle bestanden uit de p1mon/data directory rechtstreeks kopieren/terug zetten.
Hoi Marcel,
Er staat geen ‘beantwoorden’ knop bij je laatste reactie, vandaar dat ik even via een nieuw bericht reageer.
Je laatste bericht:
Probeer anders ook eens het P1SerReader process te herstarten. Kill het process P1SerReader, kijk of socat draait (even met cat /dev/ttyUSB0 of zo kijken of er ook data binnenkomt) en dan de reader weer starten dmv /p1mon/scripts/P1SerReader &
Heb P1SerReader gekilled, gechecked of socat nog draait middels cat /dev/ttyUSB1 en komt gewoon data op binnen. /p1mon/scripts/P1SerReader &, uitgevoerd en hij is weer verbonden. Maar voor hoe lang, geen idee 😛
De log van socat kan ik evt ook doorgeven maar is gigantisch groot, kan ik die ergens uploaden/doormailen?
Die log heb ik niet nodig als ik zo zie. Het probleem ontstaat doordat de remote reader de connectie reset (connection reset by peer) om de een of andere reden. De P1monitor probeert dat te herstellen maar dat gaat dus fout. Het enige wat ik kan aanpassen is dat het P1SerReader ook herstart wordt op het moment dat de connectie wegvalt. Daar zal er eens naar kijken.
Dat zou geweldig zijn! Want vind P1 Monitor in docker echt super fijn!
Ik heb een aanpassing gemaakt in de laatste versie. Bij het onverwachts stoppen van de socat connectie wordt er wat verder gekeken waardoor in meerdere gevallen de verbinding herstelt wordt.
Ps. moet dat nog via de onderstaande environment regel?
– SOCAT_CONF=”pty,link=/dev/ttyUSB1,rawer,group-late=dialout,mode=660 tcp:10.0.1.14:23,retry=forever,interval=30″
Gezien in P1 Monitor zelf onder de settings P1 poort staat ja ook een vakje ‘Socat configuratie’ welke je kan aan/uit zetten en dan voorzien van IP adres en IP poort.
Echter als ik hier hetzelfde IP adres en poort invul (en natuurlijk de environment regel heb weggehaald in de compose file) dan werkt het niet, blijft eronder staan: Laatste succesvolle start: onbekend
Dit is inderdaad nog niet via de GUI configureerbaar dus je moet nog gebruik maken van de socat regel. Ik ga er binnenkort naar kijken als ik weer wat tijd over heb 🙂
Nice nice, thanks alvast 🙂
Ik heb helaas ook dat SOCAT niet (meer) goed werkt. Telkens is er geen verbinding, dan herstart ik de docker container en dan werkt het weer.
Mijn config:
version: ‘3.8’
services:
p1monitor:
hostname: p1mon
image: mclaassen/p1mon
container_name: p1monitor
ports:
– 81:80
volumes:
– p1monitor:/p1mon/data
– p1monitor:/p1mon/mnt/usb
– p1monitor:/p1mon/mnt/ramdisk
tmpfs:
– /run
– /tmp
environment:
– SOCAT_CONF=”pty,link=/dev/ttyUSB1,rawer,group-late=dialout,mode=660 tcp:10.0.1.14:23,retry=forever,interval=30″
restart: unless-stopped
volumes:
p1monitor:
Heb last met SOCAT configuratie, na een paar uur valt de connectie weg, herstarten van docker lost het op, maar das natuurlijk niet zo handig.
Wat gaat er precies mis en welke configuratie regels gebruik je? Als de socat service echt stopt zou hij opnieuw gestart moeten worden vanuit cron. In /var/log/socat.log kun je ook eventueel extra informatie vinden. Op forum.p1mon.nl zijn er nog andere gebruikers van socat dus misschien dat daar ook nog meer informatie is te vinden/verkrijgen
Ik heb hetzelfde probleem 🙁 Mijn configuratie:
version: ‘3.8’
services:
p1monitor:
hostname: p1mon
image: mclaassen/p1mon
container_name: p1monitor
ports:
– 81:80
volumes:
– p1monitor:/p1mon/data
– p1monitor:/p1mon/mnt/usb
– p1monitor:/p1mon/mnt/ramdisk
tmpfs:
– /run
– /tmp
environment:
– SOCAT_CONF=”pty,link=/dev/ttyUSB1,rawer,group-late=dialout,mode=660 tcp:10.0.1.14:23,retry=forever,interval=30″
restart: unless-stopped
volumes:
p1monitor:
Ik heb daar op het forum ook al een reactie op geschreven. Misschien dat je daar eens kunt kijken of je wat testen kunt doen die het probleem oplossen. Kijk eens op https://forum.p1mon.nl/viewtopic.php?t=668 om te onderzoeken wat het onderliggende probleem is
Hoi Marcel,
Bedankt voor de snelle reply.
De log geeft aan:
2023/08/10 07:14:16 socat[68] W read(8, 0x558b434000, 8192): Connection reset by peer
Service socat stopped
Starting multipurpose relay: socat.
Service socat restarted
service socat status zegt: socat is running
Terwijl in P1 Monitor zegt bij status: Seriële device in gebruik: /dev/ttyUSB1
Stoppen en starten van de service verhelpt het niet, moet echt de container herstarten dan werkt deze weer. Ik heb de extra logging aangezet, zodra die dadelijk weer wegvalt plaats ik de log
Probeer anders ook eens het P1SerReader process te herstarten. Kill het process P1SerReader, kijk of socat draait (even met cat /dev/ttyUSB0 of zo kijken of er ook data binnenkomt) en dan de reader weer starten dmv /p1mon/scripts/P1SerReader &
Hallo Marcel,
Weer succesvol kunnen upgraden naar 2.2.0 via jouw docker, dank je wel voor de super snelle service!.
Groet,
Vandaag heb ik de container geupdate:
“`sudo docker-compose down && sudo docker-compose pull && sudo docker-compose up“`
docker-compose.yml:
“`
version: ‘3.8’
services:
p1monitor:
hostname: p1mon
image: mclaassen/p1mon
ports:
– 81:80
volumes:
– ./alldata/data:/p1mon/data
– ./alldata/usbdisk:/p1mon/mnt/usb
tmpfs:
– /run
– /tmp
– /p1mon/mnt/ramdisk
devices:
– “/dev/ttyUSB0”
restart: unless-stopped
#environment:
#- DISABLECPUTEMP=true
#- PROXYPATH=marcel
expose:
– “81”
“`
Nu geeft hij de volgende foutmeldingen: Hoe kan ik dat oplossen?
“`
p1monitor_1 | Modifying scripts..
p1monitor_1 | touch: setting times of ‘/p1mon/p1monenv/bin/activate’: Operation not permitted
p1monitor_1 | sudo: error in event loop: Operation not permitted
p1monitor_1 | sudo: unexpected child termination condition: 0
p1monitor_1 | sudo: error in event loop: Operation not permitted
p1monitor_1 | sudo: unexpected child termination condition: 0
p1monitor_1 | touch: setting times of ‘/var/tmp/.firstrun’: Operation not permitted
p1monitor_1 | Starting cron
p1monitor_1 | sudo: error in event loop: Operation not permitted
p1monitor_1 | sudo: unexpected child termination condition: 0
p1monitor_1 | Starting nginx
p1monitor_1 | sudo: error in event loop: Operation not permitted
p1monitor_1 | sudo: unexpected child termination condition: 0
p1monitor_1 | Starting php-fpm
p1monitor_1 | Starting periodic command scheduler: cron.
p1monitor_1 | sudo: error in event loop: Operation not permitted
p1monitor_1 | sudo: unexpected child termination condition: 0
p1monitor_1 | sudo: error in event loop: Operation not permitted
p1monitor_1 | sudo: unexpected child termination condition: 0
p1monitor_1 | Starting nginx: nginxStarting p1mon
p1monitor_1 | sudo: error in event loop: Operation not permitted
p1monitor_1 | sudo: unexpected child termination condition: 0
p1monitor_1 | Setting ramdisk rights
p1monitor_1 | sudo: error in event loop: Operation not permitted
p1monitor_1 | sudo: unexpected child termination condition: 0
p1monitor_1 | Writing cron
p1monitor_1 | chown: cannot access ‘/p1mon/mnt/ramdisk/*db’: No such file or directory
“`
Hier lijkt wel van alles mis te gaan. Lijkt haast dat er iets mis is met je docker image (of docker zelf). Er vanuit gaande dat het voor de update wel goed werkte zal het ook niet aan je compose file liggen. Probeer eens een nieuwe docker-compose pull na eerst het oude image te verwijderen met docker rmi mclaassen/p1mon:latest nadat je alles hebt gestopt en gekeken of alles is afgesloten. Met docker blijven nog weleens wat onafgesloten services o.i.d. Dan zou je de docker service nog eens kunnen herstarten
Hoi ik heb jouw laatse versie p1 docker draaien maar alleen de backup lukt niet gescheduled maar wel handmatig naar synology zit er een bug in eerder had ik die niet in de eerdere versie
Ik heb daar verder niks over gehoord. Zelf gebruik ik geen Synology dus kan het ook niet testen. Heb je logging beschikbaar mbt de backup? Staat er iets bijzonders in. Verder wil de container opnieuw creeeren ook weleens helpen (mocht je dat nog niet geprobeerd hebben).
Overigens is de hele backup voor een docker container net zo eenvoudig te regelen door je data directory te kopieren. Als dit nog steeds niet helpt misschien dat dan het forum https://forum.p1mon.nl/search.php?keywords=synology
Werkt als een tierelier, thnx!
Hallo Marcel,
Dank voor de versies! In mijn nieuwe set-up lijkt er iets niet meer helemaal goed te gaan, ik ben benieuwd of jij dit eerder hebt gezien. Ik loop tegen een probleem met het importeren van mijn oude data aan (ik zou graag migreren van een Pi naar Portainer).
Omdat ik wat heb zitten experimenteren met Portainer heb ik twee versies lopen. Mijn eerste versie lijkt volledig te functioneren, maar mijn tweede versie niet. Het enige verschil dat ik kan bedenken (ik vergelijk de twee compose files) is dat op mijn nieuwe omgeving (zeg maar productie) ik de presistent data op een NFS share op mijn nas wegschrijf. Hier komen na het runnen van de compose file netjes alle mappen te staan en de container start en lijkt volledig funtioneel. Echter, importeren en exporteren van data werkt niet. Hij blijft hangen op de eerste stap, maar begint niet te lopen. Onderstaand mijn compose file. Komt dat bekend voor?
Mvg,
Sjors
version: ‘3.8’
services:
p1monitor:
hostname: p1mon
image: mclaassen/p1mon
privileged: true
stop_grace_period: 1m
ports:
– 8090:80
volumes:
– /mnt/portainer/p1monitor/data:/p1mon/data
– /mnt/portainer/p1monitor/usbdisk:/p1mon/mnt/usb
– /mnt/portainer/p1monitor/mnt/ramdisk:/p1mon/mnt/ramdisk
tmpfs:
– /run
– /tmp
devices:
– /dev/ttyUSB0:/dev/ttyUSB0
restart: unless-stopped
Hallo Sjors,
Dat zou iets met de rechten van portainer te maken kunnen hebben. Kun je in de logfiles zien of er ergens fouten optreden?
Je hoeft overigens geen export/import te gebruiken als je de container versie gebruikt: Je kunt nl. gewoon alle bestanden van je oude data directory kopiëren naar je nieuwe data directory. Wel even terwijl ze uit staan natuurlijk.
Mocht je nog meer vragen mbt portainer hebben, op forum.p1mon.nl zijn er ook nog andere gebruikers die eenzelfde setup hebben. Kijk bijvoorbeeld eens hier: https://forum.p1mon.nl/viewtopic.php?t=110
Hi Marcel,
Dank voor je antwoord. Ik denk inderdaad dat het met schrijfrechten te maken heeft. Wellicht omdat de container een ander IP heeft dan de range die toegang heeft op de NFS share. Voor nu laat ik hem gewoon op de nadere portianer lopen, te weinig expert om het helemaal uit te zoeken.
Dank voor je antwoord!
Sjors
Heel erg bedankt voor deze versie, Marcel!
Een raspberry pi is tegenwoordig moeilijk te krijgen. De goedkope orangepi 2 LTS is verkrijgbaar voor minder dan 50 euro op Ali en werkt prima met je docker image.
Bedankt voor de info!
Hi Marcel,
Ik draai jou versie nu inmiddels achter een reverse proxy echter als suddomain ipv subfolder ik merk alleen dat ik dan de data niet meer zie in p1mon.
Werkt het uberhaupt achter een reverse proxy middels subdomain of kan het alleen met subfolder??
Hi Richard, achter een subdomein zou het sowieso moeten werken. Ik ga er vanuit dat je het gewoon in de root van je domein draait? De parameter PROXYPATH heb je dan iig niet nodig. (Excuus voor de late reactie, ik had deze even gemist).
Hallo Marcel,
Op de laatste versie van raspberry pi 4 (model B rev 1.4) gaf de versie van docker compose (1.25) problemen in combinatie met docker-compose.
De versie die de yml aangeeft is 3.x .. die 2 gaan niet samen met docker compose versie 1.25
Wat voor mij werkte:
-> https://withblue.ink/2020/06/24/docker-and-docker-compose-on-raspberry-pi-os.html
eventueel: https://gist.github.com/chadhutchins182/9e6f48d61c2875f45b2e08106b8de90c
https://statswork.wiki/engine/security/rootless/
https://www.reddit.com/r/docker/comments/symkwr/installing_docker_compose_v2_on_raspberry_pi_4/
https://www.piawesome.com/how-tos/Docker%20%26%20Docker%20Compose%20on%20Raspberry%20Pi
rootless docker: https://docs.docker.com/engine/security/rootless/
+ (aanpassen poort of sysctl.conf)
/p1-monitor $ docker-compose up -d
[+] Running 0/1
⠹ Container p1-monitor-p1monitor-1 Starting 0.2s
Error response from daemon: driver failed programming external connectivity on endpoint p1-monitor-p1monitor-1 (b9599d1def25392f17951af0c48f7a8ded5b0ecf5ccd78d88be476e2d475be7e): Error starting userland proxy: error while calling PortManager.AddPort(): cannot expose privileged port 80, you can add ‘net.ipv4.ip_unprivileged_port_start=80’ to /etc/sysctl.conf (currently 1024), or set CAP_NET_BIND_SERVICE on rootlesskit binary, or choose a larger port number (>= 1024): listen tcp4 0.0.0.0:80: bind: permission denied
docker-compose versie 1.25 zal zeker problemen geven inderdaad. Waarom upgrade je niet gewoon naar een recente versie? 1.25 is meer dan 3 jaar oud of zo
Hoi Marcel,
Er lijkt een probleem in het socat configuratie script (wellicht doordat de nieuwe P1 monitor software 2.1.0 ook zelf Socat configuratie heeft.
De foutmelding die ik kreeg was deze (blijkbaar wil hij direct de OPTIONS uitvoeren ipv te exporteren):
p1mon@p1monitor-74d8b57df6-hj7x4:/etc/init.d$ cat /etc/default/socat
OPTIONS=pty,link=/dev/ttyUSB1,rawer,group-late=dialout,mode=660 tcp:192.168.100.139:23,retry=forever,interval=30
p1mon@p1monitor-74d8b57df6-hj7x4:/etc/init.d$ systemctl status socat
/etc/init.d/socat: 1: /etc/default/socat: tcp:192.168.100.139:23,retry=forever,interval=30: not found
socat is not running … failed!
Ik heb deze kunnen oplossen door als workaround de SOCAT_CONF te veranderen in:
containers:
– name: p1monitor
env:
– name: SOCAT_CONF
value: ‘export OPTIONS=”pty,link=/dev/ttyUSB1,rawer,group-late=dialout,mode=660 tcp:192.168.100.139:23,retry=forever,interval=30″‘
Nu draait hij als een zonnetje op mijn Kubernetes cluster.
Bedankt!
Hallo Harm Jan,
er zat inderdaad een fout in versie 2.1.0 maar ik dacht dat ik die opgelost had in versie 2.1.0a. Heb je deze laatste versie geinstalleerd of draaide je nog 2.1.0? Alhoewel dit wel een andere foutmelding is idd. Ik ga ervan uit dat je socat in de interface uit hebt staan?
Zijn er verder nog afwijkingen/verbeteringen mbt de kubernetes configuratie van hierboven overigens?
Hoi Marcel,
Versie 2.1.0a gaat niet helpen.
De oorzaak is dat de service socat het bestand /etc/default/socat insourced met “. /etc/default/socat”.
De OPTIONS variabele is gevuld met data die gescheiden is door een spatie. Dat betekent dat het gedeelte voor de spatie in de OPTIONS variabele wordt gestopt, en het gedeelte na de spatie als commando wordt uitgevoerd.
De oplossing is om er quotes omheen te zetten, zie mijn bericht van een paar dagen geleden hieronder. Dat zorgt ervoor dat de OPTIONS variabele 1 regel bevat met 2 elementen, gescheiden door een spatie. Dat wordt aan socat meegegeven, die 2 argumenten verwacht (en die krijgt, omdat er een spatie in zit).
vr. groeten,
Jacco
Ik heb nog even wat onderzoek gedaan (omdat dit ook gebruikt wordt zonder problemen) en het lijkt erop dat dit optreedt omdat kubernetes anders omgaat met deze environment variabelen. Docker plaatst de quotes in de variabele en kubernetes haalt de quotes weg. In de komende versie zal ik dat aanpassen. Voor nu werkt het geheel omsluiten met single quotes (in mijn omgeving iig) ook:
value: '"pty,link=/dev/ttyUSB1,rawer,group-late=dialout,mode=660 tcp:192.168.100.139:23,retry=forever,interval=30"'
Ja, dit lijkt inderdaad te werken! Helaas blijkt mijn verbinding er met de p1 meter er na ca 5 minuten mee op te houden; het verwijderen en herdeployen lijkt het dan weer even op te lossen. Ik gebruik de slimme meter van: https://www.zuidwijk.com/p1-modules/
Iemand suggesties om dit op te lossen? 😉
Hoi Marcel,
Ik ben lekker aan het knutselen met jouw project. De container draait bij mij op een kuberntes cluster, en de p1 data wordt via een p1 wifi dongle van homewizard betrokken.
Hierbij liep ik tegen een probleempje aan met het doorgeven van de SOCAT configuratie aan de container.
In mijn geval moet het volgende in /etc/default/socat terechtkomen:
OPTIONS=”pty,link=/dev/ttyUSB4,rawer,group-late=dialout,mode=660 exec:/p1mon/extra/readp1.sh”
Ik zou graag hiervoor een pull-request aanmaken. Maar de meest recente versie die ik in github kan vinden in 1.7.0d, en niet 2.1.0.
Het startscript /entrypoint.sh draait onder gebruiker p1mon, waardoor in regel 30 een fout optreedt:
/entrypoint.sh: line 30: /etc/default/socat: Permission denied
Regel 30 bevat:
sudo echo “OPTIONS=$SOCAT_CONF” > /etc/default/socat
De foutmelding komt doordat eerst output redirection wordt gedaan naar /etc/default/socat als gebruiker p1mon, die daar geen schrijfrechten heeft. En pas daarna wordt het echo commando via sudo aangeroepen. Dat heeft geen zin, en hierdoor kan de socat service niet starten (want: geen OPTIONS). Daarnaast moeten er dubbele quotes om de SOCAT_CONF opties geen, omdat anders het gedeelte na de spatie als 2e commando wordt gezien.
Dit is op te lossen door regel 30 te veranderen in:
sudo su -c “echo OPTIONS=\\\”$SOCAT_CONF\\\” > /etc/default/socat”
Hallo Jacco,
dank voor je reactie. Ik lig inderdaad wat achter met het bijwerken op Git. Ik zal dat binnenkort even doen.
Mbt je opmerking: ik gebruik zelf geen socat dus was daar ben ik nog niet achter gekomen. Ik heb wel een heel aantal gebruikers die het wel (succesvol) gebruiken dus daar had ik het ook al van verwacht. Ik heb het probleem inmiddels gevonden. In de vorige versie(s) bestond het bestand socat al met p1mon als eigenaar. In deze versie is dat gewijzigd naar root met het bijkomende probleem. Ik heb inmiddels een nieuwere image versie gepushed dus kijk daar eens naar
Hallo Marcel,
Sinds upgrade naar version 2.0 van p1-monitor werkt de cron-based automatische backup middels FTP niet meer. Handmatig echter wel; als ik de knop “test” klik wordt de backup correct weggeschreven. De container draait op een RPI-3B, met DietPi 8-11 als besturingssysteem. Docker version: 20.10.21
Alle andere zaken werken zoals het uitlezen van verbruik van water en elektra, werken perfect.
Waar zou ik een kunnen zoeken voor een oplossing?
Hallo Kees,
Inmiddels is een versie 2.1 beschikbaar dus ik zou allereerst eens upgraden naar deze versie. Overigens is voor de backup alleen maar nodig om een kopie van de data directory te maken dus dat zou je ook nog buiten de container om kunnen doen. Verder staat op https://forum.p1mon.nl ook veel informatie mbt dit soort problemen dus kijk daar ook eens
Dank je wel Marcel, voor je vlotte respons en advies. Versie 2.10 staat er intussen op, maar kent hetzelfde euvel. Ik heb echter je advies ter harte genomen en maak nu dagelijks een backup van de data met behulp van DietPi’s eigen backup module. Werkt ook prima. Net als je P1Mon container trouwens.
Dag Marcel,
Ik probeer jou docker container werkend te krijgen in Rancher versie 2.6. De container loopt. Maar geen data wordt ingelezen van de slimme meter. In de P1 poort configuratie komt vervolgens de melding: Seriële device in gebruik: onbekend. Het opgegeven device is /dev/ttyUSB0. Dit device is ook lokaal (Ubuntu server 20) aanwezig in de /dev list en is in de Pods bind mount naar /dev/ttyUSB0 als excisting character device geconfigureerd.
Opmerkelijk is wel dat de alldata directory niet wordt aangemaakt. Alle data files met extensie .db inclusief de dbx directory komen uit in /home/user/p1mon directory.
Heb je een idee waaraan dit zou kunnen liggen?
Hoi Marcel,
Het ziet er naar uit dat het communicatie probleem is opgelost. Verwijder het type van de mount Anything to not check mount.
De alldata directory blijft weg of leeg al ik deze zelf aanmaak.
Groet, John
Ik had deze reactie even gemist! Heb je het ondertussen al opgelost? Ik heb dit werkend onder K3S dus het zou moeten kunnen functioneren. Wat is je configuratie file?
Hoi Marcel,
Sinds kort loop ik tegen een issue aan met het gebruik van mijn usb > p1 kabel.
Ik moet steeds na het starten van de docker container een chmod 777 op de /dev/ttyUSB0 doen.
Heb je enig idee wat de oorzaak hiervoor kan zijn en hoe ik dit kan afvangen?
Mijn compose file ziet er zo uit:
version: ‘3.8’
services:
p1monitor:
hostname: p1mon
image: mclaassen/p1mon
privileged: true
stop_grace_period: 30s
ports:
– 81:80
– 9443:443
volumes:
– /mnt/disk2/appdata/p1mon/data:/p1mon/data
– /mnt/disk2/appdata/p1mon/usbdisk:/p1mon/mnt/usb
– //mnt/disk2/appdata/p1mon/ramdisk:/p1mon/mnt/ramdisk
tmpfs:
– /run
– /tmp
devices:
– /dev/ttyUSB0:/dev/ttyUSB0
restart: unless-stopped
Hoi Robin,
Ik weet het zo niet zeker maar als het goed is heb je privileged parameter niet nodig. Je mapped nl. ttyUSB0 van de host al naar de container. Het zou kunnen dat er dan dat ervoor zorgt dat de rechten worden gewijzigd.
Hoi Robin,
ik heb hetzelfde probleem op mijn QNAP nas. De rechten van /dev/tyyUSB0 op mijn nas zijn: crw——- 1 admin administrators 188, 0 2022-10-04 13:56 /dev/ttyUSB0
Dit wordt ook netjes op die manier gekoppeld in het Docker image, maar die rechten zijn niet voldoende voor user p1mon om de data uit te lezen. Als je via de console inlogt op het image en daar chmod 666 /dev/ttyUSB0 uitvoert werkt het, alleen moet je dat na iedere restart doen. Ik ben ook nog steeds aan het zoeken om dit niet iedere keer handmatig te moeten doen. Dus ik heb helaas (nog) geen oplossing voor je.
Dat zou eigenlijk niet nodig moeten zijn maar blijkbaar gaat de QNAP hier anders mee om. Dus zowel gebruik met, als zonder de privileged parameter levert dit probleem op?
Hi Marcel,
Ja met of zonder parameter maakt geen verschil. Zonder handmatige actie is komt er geen data binnen. Ik ben al het zoeken geweest of ik in het image d.m.v. een scheduled task ofzo de rechten van ttyUSB0 kan aanpassen, maar tot nu toe zonder succes. Ik word hierbij ook wel gehinderd door mijn beperkte kennis.
Ik kan vanavond het nog eens met het nieuwe image proberen, met en zonder privileged.
Dank weer voor de update.
Hi Marcel,
Met de nieuwe versie heb ik (nog) geen problemen gehad met de P1 pport, maar ik krijg wel deze meldingen in mijn log file. Ik heb alle folders en bestanden al een keer verwijderd, maar krijg de melding gelijk weer. Enige idee?
10/13/2022 09:02:43
2022-10-13 09:02:43 [FALCON] [ERROR] GET /api/v1/status?_=1665644447749 => Traceback (most recent call last):
10/13/2022 09:02:43
File “/p1mon/scripts/P1Api.py”, line 2011, in on_get
10/13/2022 09:02:43
records = rt_status_db.select_rec( sqlstr )
10/13/2022 09:02:43
File “/p1mon/scripts/sqldb.py”, line 791, in select_rec
10/13/2022 09:02:43
self.cur.execute(sqlstr)
10/13/2022 09:02:43
sqlite3.OperationalError: database is locked
10/13/2022 09:02:43
10/13/2022 09:02:43
During handling of the above exception, another exception occurred:
10/13/2022 09:02:43
10/13/2022 09:02:43
Traceback (most recent call last):
10/13/2022 09:02:43
File “falcon/app.py”, line 365, in falcon.app.App.__call__
10/13/2022 09:02:43
File “/p1mon/scripts/P1Api.py”, line 2032, in on_get
10/13/2022 09:02:43
raise falcon.HTTPError(
10/13/2022 09:02:43
File “falcon/util/deprecation.py”, line 105, in falcon.util.deprecation.deprecated_args.deprecated_args.wraps
10/13/2022 09:02:43
File “falcon/http_error.py”, line 104, in falcon.http_error.HTTPError.__init__
10/13/2022 09:02:43
TypeError: __init__() got an unexpected keyword argument ’titel’
Als ik het zo eens lees lijkt het erop dat er iets met een van de databases is. Als ik het zo zie gaat het om de status.db. Probeer eens handmatig http://
Hi Marcel,
Als ik handmatig de die URL aanroep, krijg ik in platte tekst een heleboel informatie. Zoals bijvoorbeeld:
“Max dagwaarde Kw verbruik”, 0], [2, “2022-10-15 07:36:40”, “Max dagwaarde Kw verbruik (timestamp)”, 0], [3, “0.0”, “Max dagwaarde Kw geleverd
Ps Ik krijg deze melding ook als ik een nieuwe container aanmaak, in een andere folder zodat alles opnieuw wordt gecreëerd.
Hey Martijn,
ik kan dit zelf allemaal niet testen maar misschien dat op het forum anderen dit bekend voorkomt. Ik ga er vanuit dat je wel de laatste versie van docker/docker-compose hebt geinstalleerd maar deze melding kan ik verder niet thuisbrengen of reproduceren
Hoi Marcel,
Ik heb sindskort de Smart meter Gateway https://smartgateways.nl/ztatz-p1-monitor-uitlezen-met-silmme-meter-wifi-gateway/
De socat script lijkt niet te werken. Als ik in de container kijk met de root user dan zie ik in /dev/ geen ttyUSB0. Ook de verbruik meter blijft statisch op 1 waarde staan. Ik heb onderstaande entries apart van elkaar geprobeerd, maar beide geven hetzelfde resultaat.
– SOCAT_CONF=”pty,link=/dev/ttyUSB0,raw,user=root,group=dialout,mode=660 tcp:10.0.0.21:23,retry=forever,interval=30″
– SOCAT_CONF=”pty,link=/dev/ttyUSB0,rawer,group-late=dialout,mode=660 tcp:10.0.0.21:23,retry=forever,interval=30″
Doe ik iets verkeerd?
Hi Francis,
Ik gebruik de gateway zelf niet maar heb je al op forum.p1mon.nl gekeken? Misschien dat je daar je antwoord vindt
Hoi Marcel,
Maar ik denk dat er iets met de conatiner is omdat SOCAT geen ttyUSB0 in /dev/ aanmaakt. Als ik direct de container inga via bash en het socat command gebruik dan wordt de /dev/ttyUSB0 wel gecreerd waardoor het allemaal keurig werkt.
Ik denk dat er inderdaad iets anders aan de hand is. Ik ga even verder “prutsen”
bedankt
Hey Francis,
heb je het nog werkend gekregen?
Eindelijk na lang zoeken dit gevonden. Dit zou moeten werken op mijn odroid n2+ toch ?
Dit zou in principe wel moeten werken want het is volgens mij een arm64v device. Misschien dat je nog wat met je portmapping moet doen maar dat kun je wel ergens vinden
Yes het werkt !! mooi man. echt super.
Hoi alleen ff vraagje is het mogelijk ergens om de adressen van de gpio pins te wijzigen in de source
op mijn odroid n2+ hebben ze namelijk een andere benaming / adres dan een raspberry volgensmij .
https://wiki.odroid.com/odroid-n2/application_note/gpio/enhancement_40pins#tab__odroid-n2
Ik denk dat dat wel moet kunnen. Ik zal er eens naar kijken zo gauw ik ook aan de v2 begin. Je kunt overigens ook op de GitHub repo kijken of je het kunt vinden.
heb het al gevonden 🙂 denkik en aangepast config-water.php
function makeSelectortGPIO( $id ) {
$configValue = config_read( $id );
for ( $i=476; $i<495; $i++ ) {
if ( $configValue == $i ) {
$selected = 'selected="selected"';
} else {
$selected = '';
}
echo '’ . $i .”;
Hoeveel geheugen heeft de raspberry nodig om docker, P1-Monitor en het besturen van slimme schakelaars aan te kunnen?
Is 2 GB genoeg op een Pi 3 of een Pi zero met 512MB ?
Een Pi zero 512Mb zal wat krap worden denk ik (probeer het eens) maar een Pi 3 met 2GB zou zeker moeten werken
Hallo marcel,
is er ook een manual hoe ik dit werkend ga krijgen op een synology?
Ik zie dat het mensen al is gelukt maar waar ik moet beginnen….kun je me op weg helpen?
Hallo Ries,
Ik heb er zelf geen maar heb je al eens op https://www.synology.com/en-global/dsm/packages/Docker gekeken? Daar moet je beginnen lijkt me. Van daaruit kun je een image toevoegen met, volgens mij, in het artikel genoemde configuratie
Hallo Marc,
Het image draait al een tijdje op mn nad.
Ik heb hem ook gewoon benaderen.
Alleen het wegschrijven van gegevens wil niet lukken. Opslaan van settings e.d.
Ik zie ook geen .db bestand in de map staan van p1monitor.
Verder is het even zoeken naar hoe ik die usb ook werkend krijg.
Ik draai op mn naar trouwens alles als root. Deze nas is alleen lokaal benaderbaar.
Misschien dat je een op forum.p1mon.nl kunt kijken. Er zijn meerdere die dit draaien op een Synology dus misschien dat die je op weg kunnen helpen
Hoi Marcel,
Ik probeer het image te draaien op mijn QNAP NAS, met de compose file lukt het ook om P1mon te draaien, maar de P1 poort wordt niet herkend. Ik krijg de melding Seriële device in gebruik: onbekend. Herken je deze melding en heb je er eventueel een suggestie om het op te lossen?
Ik heb via Home Assistant een integratie met de P1 poort gemaakt en dat lijkt wel te werken. Ik de integratie weer verwijderd om conflicten te voorkomen.
Groet,
Martijn
Hallo Martijn,
Het zou kunnen dat QNAP geen toegang geeft tot je seriele poort. Ik neem aan dat je de mapping wel goed hebt staan? Mocht dat alsnog niet werken probeer anders eens de optie ‘privileged: true’ toe te voegen aan je compose file. Eventueel kun je op forum.p1mon.nl nog eens vragen of andere gebruikers dt probleem herkennen.
-Marcel
Hi Marcel,
Het toevoegen van de optie privileged was niet de oplossing. Wat wel? Ik heb de rechten van /dev/ttyUSB0 aangepast naar 777.
Dank voor je reactie en het P1 image 😉
Groet,
Martijn
Heb je de rechten aangepast op de host of in de container? En heb je de juiste host port gemapped naar de container?
Ik heb het op de host aangepast en in mijn compose file hetzelfde als jij: – /dev/ttyUSB0:/dev/ttyUSB0
Misschien overbodig maar heb je al gekeken of er data binnenkomt op je USB poort? Als je dat allereerst controleert vanuit je host?
Hoi
Ik heb je p1mon versie draaien maar loop tegen het volgende als ik een backup maak kan dat alleen naar een root folder ipv subfolder. Sftp naar synology
heb je al in de logging gekeken wat de foutmelding is? Zou op zich gewoon moeten kunnen. Overigens kun je, als je een backup wilt maken, ook gewoon een backup maken van de hele data directory. Er zijn volgens mij wat problemen als je lokaal een backup wilt maken.Kijk maar eens bij https://marcel.duketown.com/p1-monitor-docker-versie/#comment-1545 en daarnaast ook eens op forum.p1mon.nl. Daar zijn ook andere gebruikers die op synology draaien
Hoi,
Ik zou heel graag je programma willen gebruiken maar ben alleen ontzettende noob.
Zou je template kunnen maken voor portainer waarbij gebruik gemaakt wordt van een ramdisk
Hallo Ton,
kijk eens op het p1monitor forum. in de Docker en Portainer groep worden daar voorbeelden gegeven en hulp geboden. https://forum.p1mon.nl/viewforum.php?f=8
Dank voor de link. Kijken of het zo lukt
Hoi Marcel, ik had P1 monitor al veel eerder gezien als image, maar ik wil daar geen complete Rpi aan opofferen. Met Docker wil ik graag gebruik maken van P1mon, maar krijg helaas p1mon nog niet aan de praat. In de docker log krijg ik na het ftpgedeelte de melding: smbd unrecognized service. In mijn ogen een melding van een ontbrekende Samba server, maar ook na installatie van Samba blijf ik dezelfde melding krijg. Waar moet ik de oplossing zoeken?
Hallo Mark,
de ‘smdb unrecognized service’ melding kun je negeren. Samba is niet geinstalleerd in de container image dus vandaar die melding. Ik zal een wijziging aanbrengen zodat de melding ook verdwijnt. ALs je alleen deze melding krijgt zou je image gewoon moeten draaien. Werkt er verder iets niet?
Hoi Marcel, dank je wel weer voor het zo snel beschikbaar stellen van de nieuwe versie op docker voor mijn raspberry. zojuist ge-pulled.
Groet
Prima, ook goed te horen dat hij op raspberry gebruikt wordt!
Ik lijk toch een issue te hebben met de nieuwe 1.7.0 versie onder docker. Ik kan geen data importeren.
Hij blijft dan hangen op “Even geduld aub, verwerking start over enkele seconden.”
Met 1.6.0 met exact de zelfde config werkt dit wel goed. Docker arm64 op een Pi3+
Ik heb het even nagekeken. Ik heb de normale import gebruikt (met zipfile) en die geeft geen problemen bij mij. Overigens, waarom ga je de data importeren? Dat zou niet nodig moeten zijn. Gewoon image updaten en opnieuw starten is afdoende. De aanwezige databases worden gewoon ingeladen.
En toch is er iets vreemds met 1.7.0 🙂
Nieuwe schone docker 1.7.0 -> import werkt niet
Nieuwe schone docker 1.6.0 -> import werkt wel
Updaten van de image van 1.6.0 naar 1.7.0 gaat verder prima en gek genoeg de import werkt dan ook weer. (die dan niet nodig is)
Maar goed het is opgelost op deze manier, bedankt voor het meekijken.
Ik heb nog even wat verder gekeken en er zijn inderdaad, als je compleet met nieuwe databases opnieuw start, wat dingen die niet helemaal werken dus je hebt wel gelijk. Ik ga even kijken wat het probleem is.
Ik heb het probleem opgelost en een nieuwe versie beschikbaar gemaakt
Hello Marcel,
ik heb het nu ook draaien op mijn synology NAS DS920+ in docker.. alleen ik heb probleem met het terug zetten van de export die ik had gemaakt van de oude software dat werkte op een Pi Zero Wifi. ik krijg de melding: “ERROR status file schrijf/lees fout: list assignment index out of range”
heb ook best veel database Lock berichten.
kan je me verder helpen om die import weer werkend te krijgen?
groeten,
Mark
Hi Mark,
Wat was de versie van P1monitor die je op de zero draaide? En heb je, zonder de import, ook diezelfde fouten in je ligging?
Hallo Marcel,
ik draaide nog een oude versie.. maar heb die Pi Zero geupdated met USB stick zodat alles op de nieuwe draait, daar een export van gemaakt, en dan terug geimporteerd in de zelfde PI zero, maar ook daar errors, ook die export in jou software op docker gedaan, ook het zelfde probleem, echter… nu ik vanmorgen kijk zie ik dat alle history etc toch is terug gezet… dus op een een of andere manier doet hij er heeeeel lang over lol..
ik heb de docker nu draaien, met wel nog wat rare errors.. maar de gasmeter werkt niet, ik heb de gas nummer al eens veranderd van 1 naar 2 etc.. maar in de Pi Zero staat hij gewoon op 1.. en daar werkt het.. stop ik het in de NAS doet de gas meter niks..
misschien nog een idee?
gr. Mark
Hmm, ik weet zo even niet waar je database errors vandaan komen. Dat je gas niet werkt is ook vreemd omdat alle informatie in 1 bericht komt dus dan gaat er iets in de verwerking mis blijkbaar.
Heb je je container inmiddels ook al eens opnieuw gestart? Daarnaast zou je eens op het p1monitor forum kunnen kijken (en vragen) want daar zijn anderen die ook portainer draaien en ervaring hebben met wat specifieke configuraties daarvoor: https://forum.p1mon.nl/viewforum.php?f=8
hallo Marcel,
de Gas meter blijkt wel te werken.. hij geeft nu iets aan. zoals het er nu uitziet lijkt het allemaal te werken.
al heb ik nog steeds wat gekke dingen in the logs maargoed het werkt lol
nu kan ik langzaam aan beginnen met het bouwen van de watermeter met camera etc haha
dank voor dit geweldige programma dat mooi kan draaien op een synology NAS met docker !!!
gr.
Mark
Prima, veel succes ermee en kijk over een tijdje nog eens of de logfiles geen foutmeldingen vertonen
hier heb ik nog even een copy past van de logfiles uit portainer (docker manager) 🙂
File “/p1mon/scripts/sqldb.py”, line 753, in select_rec,
self.cur.execute(sqlstr),
sqlite3.OperationalError: database is locked,
,
During handling of the above exception, another exception occurred:,
,
Traceback (most recent call last):,
File “falcon/app.py”, line 365, in falcon.app.App.__call__,
File “/p1mon/scripts/P1Api.py”, line 2007, in on_get,
code=apierror.API_DB_ERROR[‘code’],
File “falcon/util/deprecation.py”, line 105, in falcon.util.deprecation.deprecated_args.deprecated_args.wraps,
File “falcon/http_error.py”, line 104, in falcon.http_error.HTTPError.__init__,
TypeError: __init__() got an unexpected keyword argument ’titel’,
,
sudo: /sbin/init: command not found,
sudo: /sbin/init: command not found,
SIGTERM received,
[*] controleren of er voldoende ruimte is op /var/log,
[*] Folder /var/log heeft voldoende ruimte, momenteel voor 62% vol.,
Processen worden gestopt, even geduld aub.,
Geen pid gevonden voor proces P1SerReader.py, proces is niet actief.,
Geen pid gevonden voor proces P1GPIO.py, proces is niet actief.,
Killing pid(s) 241 225 186 proces naam is gunicorn,
timeout is 3 seconden.,
Er lopen geen processen meer met de naam gunicorn,
——————————————–,
Geen pid gevonden voor proces P1UdpBroadcaster.py, proces is niet actief.,
Geen pid gevonden voor proces P1DropBoxDeamon.py, proces is niet actief.,
Killing pid(s) 184 proces naam is P1UdpDaemon.py,
timeout is 3 seconden.,
Failsave kill gestart, dit is niet normaal voor proces P1UdpDaemon.py,
————————————————————,
timeout is seconden,
Geen pid gevonden voor proces P1Db.py, proces is niet actief.,
Killing pid(s) 182 proces naam is P1Watchdog.py,
Starting cron,
Starting periodic command scheduler: cron.,
Starting nginx,
Starting nginx: nginx.,
Starting php-fpm,
Starting p1mon,
[*] controleren of er voldoende ruimte is op /var/log,
[*] Folder /var/log heeft voldoende ruimte, momenteel voor 62% vol.,
2022-04-30 10:37:34 Info: Start van programma met process id 72 en als user -> p1mon,
2022-04-30 10:37:34 Info: restore: Herstellen van gegevens gestart.,
2022-04-30 10:37:34 Info: Controle op eerder gebruikt drive /dev/sda1 gestart.,
2022-04-30 10:37:35 Info: Controle op eerder gebruikt drive /dev/sdb1 gestart.,
2022-04-30 10:37:35 Info: Controle op eerder gebruikt drive /dev/sdc1 gestart.,
2022-04-30 10:37:35 Info: Controle op eerder gebruikt drive /dev/sdd1 gestart.,
2022-04-30 10:37:35 Info: restore geen folder gevonden op de drive. gestopt,
2022-04-30 10:37:35 Info: Start van programma P1DbCopy.,
2022-04-30 10:37:35 Info: Main: wordt uitgevoerd als user -> p1mon,
2022-04-30 10:37:35 Info: Start van programma met process id 99,
2022-04-30 10:37:35 Info: Main: wordt uitgevoerd als user -> p1mon,
2022-04-30 10:37:36 Info: Main: database tabel config succesvol geopend.,
2022-04-30 10:37:36 Info: Main: database tabel status succesvol geopend.,
2022-04-30 10:37:36 Info: Main: DHCP config file wordt aangemaakt.,
2022-04-30 10:37:36 Info: write_default_dhcp_config_file: huidige bestand /etc/dhcpcd.conf is al door P1-monitor gemaakt. niets aangepast.,
2022-04-30 10:37:36 Info: Main: DHCP config file gereed.,
2 seconden wachttijd,
Wifi power save wordt uitgezet.,
Wifi power save is uitgezet.,
Upgrade assist wordt gestart.,
2022-04-30 10:37:39 Info: Start van programma.,
2022-04-30 10:37:39 Info: Herstellen van gegevens gestart.,
2022-04-30 10:37:39 Info: Controle op eerder gebruikt drive sda1 gestart.,
2022-04-30 10:37:39 Info: Controle op eerder gebruikt drive sdb1 gestart.,
2022-04-30 10:37:39 Info: Controle op eerder gebruikt drive sdc1 gestart.,
2022-04-30 10:37:39 Info: Controle op eerder gebruikt drive sdd1 gestart.,
2022-04-30 10:37:39 Info: Geen data gevonden op de USB drive(s) niets uitgevoerd.,
failsave stop voor dat de processen weer worden gestart.,
Processen worden gestopt, even geduld aub.,
Geen pid gevonden voor proces P1SerReader.py, proces is niet actief.,
Geen pid gevonden voor proces P1GPIO.py, proces is niet actief.,
Geen pid gevonden voor proces gunicorn, proces is niet actief.,
Geen pid gevonden voor proces P1UdpBroadcaster.py, proces is niet actief.,
Geen pid gevonden voor proces P1DropBoxDeamon.py, proces is niet actief.,
Geen pid gevonden voor proces P1UdpDaemon.py, proces is niet actief.,
Geen pid gevonden voor proces P1Db.py, proces is niet actief.,
Geen pid gevonden voor proces P1Watchdog.py, proces is niet actief.,
Geen pid gevonden voor proces P1PowerProductionS0.py, proces is niet actief.,
Geen pid gevonden voor proces P1WatermeterV2.py, proces is niet actief.,
Geen pid gevonden voor proces P1SolarEdgeReader.py, proces is niet actief.,
Geen pid gevonden voor proces P1MQTT.py, proces is niet actief.,
2 seconden wachttijd,
P1SerReader.py gestart.,
5 seconden wachttijd,
P1Db.py gestart.,
5 seconden wachttijd,
P1DropBoxDeamon.py gestart.,
P1Watchdog.py gestart.,
P1UdpDaemon.py gestart.,
P1UdpBroadcaster.py gestart.,
P1Api gestart.,
P1GPIO.py gestart.,
Setting ramdisk rights,
Hi Marcel,
Great work! I had some issues with getting it working, by eventually it works…
To get P1 working with socat I had to use a different config then given in your example:
Given by you:
SOCAT_CONF=”pty,link=/dev/ttyUSB1,rawer,group-late=dialout,mode=660 tcp:192.168.1.200:5523,retry=forever,interval=30″
Working for me:
SOCAT_CONF=”pty,link=/dev/ttyUSB0,raw,user=root,group=dialout,mode=660 tcp:192.168.1.200:5523,retry=forever,interval=30″
Perfect! I’ll add your comment to the information above!
Hoi Marcel, heb jouw container op m’n linux server draaien en alles werkt helemaal top (moest alleen m’n gasmeter nummer van 1 naar 2 veranderen) heel fijn!
Ik vroeg me echter af als ik op de (i) click dan zie ik de geuheugenbelasting altijd rond de 95% staan. Volgens mij wordt hier het cache/buffer geheugen in meegenomen? Dus dit is dan verder geen probleem?
Hi Niels,
klopt inderdaad dat de berekening van het vrije geheugen nu op basis van ‘free’ vs ’total’ wordt gecalculeerd. Op een Linux systeem heb je dan al gauw idd rond de 95% staan. Beter is om ‘used’ te gebruiken daarvoor denk ik. Ik heb dat al in code aangepast maar zal het ook nog even doorgeven aan de P1 ontwikkelaar
Dank!
Hallo Marcel,
Zoals hierboven al aangegeven, ik draai p1mon in Docker op een Synology. Bij de instellingen wil ik graag de display waardes aanpassen (bij: waarden instellen UI elementen). Echter als ik deze aanpas (b.v. max. dagwaarde e-levering van 20 naar 10 kWh) en daarna klik op “opslaan” krijg ik steeds de melding “gegevens wegschrijven mislukt”. Enig idee hoe dit op te lossen?
Ik kom er nu achter dat ik geen enkele instelling kan aanpassen. Bij elke keer klikken op opslaan krijg ik de melding “gegevens wegschrijven mislukt”. Als aanvulling nog: ik ben 2 dagen geleden overgestapt naar het gebruik van een ramdisk door in de Docker compose file “- /p1mon/mnt/ramdisk” op te nemen. daarna met “docker compose up” de image weer opgestart.
Ik heb dat zelf ook weleens gehad en ben er nog niet achter wat de oorzaak was. Bij mij was de oplossing om de container opnieuw te creëeren (docker-compose down en weer up) en toen was het probleem weg. Kijk eens of dat bij jou ook lukt?
Hoi Marcel,
Ik krijg de docker image goed draaiend op m’n Synology. Had de p1mon ZTATZ image hiervoor op een Raspberry Pi 3b draaien. Op de Pi draaide ik met succes de backup naar een directory op de Synology. Dit lukt me echter, met dezelfde inloggegevens, niet vanuit de docker image. De foutmelding die ik krijg is:
Fout: server antwoord: * Expire in 0 ms for 6 (transfer 0x559173a97fb0)* Trying 192.168.178.241…* TCP_NODELAY set* Expire in 200 ms for 4 (transfer 0x559173a97fb0)* Connected to 192.168.178.241 (192.168.178.241) port 22 (#0)* SSH MD5 fingerprint: ebd89ed136f0d4bb23d1d593c49fc* SSH authentication methods available: publickey,password* Using SSH private key file ‘* SSH public key authentication failed: Unable to extract public key from private key file: Method unimplemented in libgcrypt backend* Initialized password authentication* Authentication complete* Failure initializing sftp session: Unable to request SFTP subsystem* Closing connection 0curl: (2) Failure initializing sftp session: Unable to request SFTP subsystem Gestopt.
Enig idee wat ik fout doe hier. Vanaf de Raspberry Pi werkt dit wel.
Hallo Aad,
Zo even wat redenen waarom het fout zou kunnen gaan:
Ik zou zeggen kijk ook eens in de logging van je SFTP server wat daar vermeld staat
Marcel, bedankt voor je tips. Helaas is het niet gelukt, waarschijnlijk ligt het aan het 1e punt, 2 en 3 zijn goed. De logging van de sftp server op de Synology laat niets zien over de inlogpogingen. Wat betreft dat eerste punt, ik weet niet hoe het IP adres van de docker container te achterhalen en als dat zou lukken heb ik ook geen idee wat en waar dit op de Synology aan te passen.
Hallo Aad,
ik ga er nog eens naar kijken. Ik zal zelf van de week even een sftp server installeren om te kijken wat er mis gaat!
Ik heb net een aantal testjes gedaan en die werkten eigenlijk allemaal prima. Zou het kunnen dat het probleem er in zit dat je een backup naar je lokale host probeert?
Overigens als dat laatste het geval is zou je misschien beter een lokale backup kunnen maken van je data directory
Na van alles te hebben geprobeerd heb ik de backup naar Dropbox aangezet en die werkt prima. Ik laat het hier voorlopig maar bij. In ieder geval super bedankt voor je tips en het meedenken, misschien dat ik later nog een keer een poging waag. Mocht het lukken dan laat ik dat natuurlijk weten.
Hoi Marcel,
Begonnen met jouw werk via docker-compose te integreren, maar ik loop tegen het probleem dat de USB device niet wordt herkend, hoewel ik zeker weet dat het /dev/ttyUSB0 is.
Als ik docker-compose up doe, krijg ik onderstaande logging, met ook foutmeldingen.
Denk je dat ik iets fout doe?.
Het compose bestand ziet er zo uit:
version: ‘3.8’
services:
p1monitor:
hostname: p1mon
image: mclaassen/p1mon
ports:
– 80:80
volumes:
– ./alldata/data:/p1mon/data
– ./alldata/usbdisk:/p1mon/mnt/usb
– ./alldata/mnt/ramdisk:/p1mon/mnt/ramdisk
tmpfs:
– /run
– /tmp
devices:
– “/dev/ttyUSB0:/dev/ttyUSB0”
restart: unless-stopped
Dus heel basic als je mij vraagt.
p1monitor_1 | Starting cron
p1monitor_1 | Starting periodic command scheduler: cron.
p1monitor_1 | Starting nginx
p1monitor_1 | Starting nginx: nginx.
p1monitor_1 | Starting php-fpm
p1monitor_1 | Starting p1mon
p1monitor_1 | [*] controleren of er voldoende ruimte is op /var/log
p1monitor_1 | [*] Folder /var/log heeft voldoende ruimte, momenteel voor 6% vol.
p1monitor_1 | 2022-01-14 15:42:31 Info: Start van programma met process id 73 en als user -> p1mon
p1monitor_1 | 2022-01-14 15:42:31 Info: restore: Herstellen van gegevens gestart.
p1monitor_1 | 2022-01-14 15:42:31 Info: Controle op eerder gebruikt drive /dev/sda1 gestart.
p1monitor_1 | 2022-01-14 15:42:31 Info: Controle op eerder gebruikt drive /dev/sdb1 gestart.
p1monitor_1 | 2022-01-14 15:42:31 Info: Controle op eerder gebruikt drive /dev/sdc1 gestart.
p1monitor_1 | 2022-01-14 15:42:31 Info: Controle op eerder gebruikt drive /dev/sdd1 gestart.
p1monitor_1 | 2022-01-14 15:42:32 Info: restore geen folder gevonden op de drive. gestopt
p1monitor_1 | 2022-01-14 15:42:32 Info: Start van programma P1DbCopy.
p1monitor_1 | 2022-01-14 15:42:32 Info: Main: wordt uitgevoerd als user -> p1mon
p1monitor_1 | 2022-01-14 15:42:32 Error: copyFile: kopie /p1mon/data/05_powerproduction.db naar /p1mon/mnt/ramdisk/ fout: [Errno 2] No such file or directory: ‘/p1mon/data/05_powerproduction.db’
p1monitor_1 | 2022-01-14 15:42:32 Info: Start van programma met process id 100
p1monitor_1 | 2022-01-14 15:42:32 Info: Main: wordt uitgevoerd als user -> p1mon
p1monitor_1 | 2022-01-14 15:42:32 Info: Main: database tabel config succesvol geopend.
p1monitor_1 | 2022-01-14 15:42:32 Info: Main: database tabel status succesvol geopend.
p1monitor_1 | 2022-01-14 15:42:32 Info: Main: DHCP config file wordt aangemaakt.
p1monitor_1 | 2022-01-14 15:42:32 Info: write_default_dhcp_config_file: huidige bestand /etc/dhcpcd.conf is al door P1-monitor gemaakt. niets aangepast.
p1monitor_1 | 2022-01-14 15:42:32 Info: Main: DHCP config file gereed.
p1monitor_1 | 2 seconden wachttijd
p1monitor_1 | Wifi power save wordt uitgezet.
p1monitor_1 | Wifi power save is uitgezet.
p1monitor_1 | Upgrade assist wordt gestart.
p1monitor_1 | 2022-01-14 15:42:34 Info: Start van programma.
p1monitor_1 | 2022-01-14 15:42:34 Info: Herstellen van gegevens gestart.
p1monitor_1 | 2022-01-14 15:42:34 Info: Controle op eerder gebruikt drive sda1 gestart.
p1monitor_1 | 2022-01-14 15:42:34 Info: Controle op eerder gebruikt drive sdb1 gestart.
p1monitor_1 | 2022-01-14 15:42:35 Info: Controle op eerder gebruikt drive sdc1 gestart.
p1monitor_1 | 2022-01-14 15:42:35 Info: Controle op eerder gebruikt drive sdd1 gestart.
p1monitor_1 | 2022-01-14 15:42:35 Info: Geen data gevonden op de USB drive(s) niets uitgevoerd.
p1monitor_1 | failsave stop voor dat de processen weer worden gestart.
p1monitor_1 | Processen worden gestopt, even geduld aub.
p1monitor_1 | Geen pid gevonden voor proces P1SerReader.py, proces is niet actief.
p1monitor_1 | Geen pid gevonden voor proces P1GPIO.py, proces is niet actief.
p1monitor_1 | Geen pid gevonden voor proces gunicorn, proces is niet actief.
p1monitor_1 | Geen pid gevonden voor proces P1UdpBroadcaster.py, proces is niet actief.
p1monitor_1 | Geen pid gevonden voor proces P1DropBoxDeamon.py, proces is niet actief.
p1monitor_1 | Geen pid gevonden voor proces P1UdpDaemon.py, proces is niet actief.
p1monitor_1 | Geen pid gevonden voor proces P1Db.py, proces is niet actief.
p1monitor_1 | Geen pid gevonden voor proces P1Watchdog.py, proces is niet actief.
p1monitor_1 | Geen pid gevonden voor proces P1PowerProductionS0.py, proces is niet actief.
p1monitor_1 | Geen pid gevonden voor proces P1WatermeterV2.py, proces is niet actief.
p1monitor_1 | Geen pid gevonden voor proces P1SolarEdgeReader.py, proces is niet actief.
p1monitor_1 | Geen pid gevonden voor proces P1MQTT.py, proces is niet actief.
p1monitor_1 | 2 seconden wachttijd
p1monitor_1 | P1SerReader.py gestart.
p1monitor_1 | 5 seconden wachttijd
p1monitor_1 | P1Db.py gestart.
p1monitor_1 | 5 seconden wachttijd
p1monitor_1 | P1DropBoxDeamon.py gestart.
p1monitor_1 | P1Watchdog.py gestart.
p1monitor_1 | P1UdpDaemon.py gestart.
p1monitor_1 | P1UdpBroadcaster.py gestart.
p1monitor_1 | P1Api gestart.
p1monitor_1 | P1GPIO.py gestart.
p1monitor_1 | Writing cron
p1monitor_1 | [2022-01-14 15:42:48 +0100] [196] [ERROR] Exception in worker process
p1monitor_1 | Traceback (most recent call last):
p1monitor_1 | File “/usr/local/lib/python3.7/dist-packages/gunicorn/arbiter.py”, line 589, in spawn_worker
p1monitor_1 | worker.init_process()
p1monitor_1 | File “/usr/local/lib/python3.7/dist-packages/gunicorn/workers/base.py”, line 134, in init_process
p1monitor_1 | self.load_wsgi()
p1monitor_1 | File “/usr/local/lib/python3.7/dist-packages/gunicorn/workers/base.py”, line 146, in load_wsgi
p1monitor_1 | self.wsgi = self.app.wsgi()
p1monitor_1 | File “/usr/local/lib/python3.7/dist-packages/gunicorn/app/base.py”, line 67, in wsgi
p1monitor_1 | self.callable = self.load()
p1monitor_1 | File “/usr/local/lib/python3.7/dist-packages/gunicorn/app/wsgiapp.py”, line 58, in load
p1monitor_1 | return self.load_wsgiapp()
p1monitor_1 | File “/usr/local/lib/python3.7/dist-packages/gunicorn/app/wsgiapp.py”, line 48, in load_wsgiapp
p1monitor_1 | return util.import_app(self.app_uri)
p1monitor_1 | File “/usr/local/lib/python3.7/dist-packages/gunicorn/util.py”, line 359, in import_app
p1monitor_1 | mod = importlib.import_module(module)
p1monitor_1 | File “/usr/lib/python3.7/importlib/__init__.py”, line 127, in import_module
p1monitor_1 | return _bootstrap._gcd_import(name[level:], package, level)
p1monitor_1 | File “”, line 1006, in _gcd_import
p1monitor_1 | File “”, line 983, in _find_and_load
p1monitor_1 | File “”, line 967, in _find_and_load_unlocked
p1monitor_1 | File “”, line 677, in _load_unlocked
p1monitor_1 | File “”, line 728, in exec_module
p1monitor_1 | File “”, line 219, in _call_with_frames_removed
p1monitor_1 | File “/p1mon/scripts/P1Api.py”, line 3, in
p1monitor_1 | import apiutil
p1monitor_1 | File “/p1mon/scripts/apiutil.py”, line 5, in
p1monitor_1 | import yaml
p1monitor_1 | ModuleNotFoundError: No module named ‘yaml’
p1monitor_1 | 2022-01-14 15:42:48 Info: Start van programma.
p1monitor_1 | 2022-01-14 15:42:48 Info: Main: wordt uitgevoerd als user -> p1mon
p1monitor_1 | 2022-01-14 15:42:49 Info: Main: FTP backup staat uit, crontab wordt gewist
p1monitor_1 | 2022-01-14 15:42:49 Info: Programma is succesvol gestopt.
p1monitor_1 | [2022-01-14 15:42:49 +0100] [197] [ERROR] Exception in worker process
p1monitor_1 | Traceback (most recent call last):
p1monitor_1 | File “/usr/local/lib/python3.7/dist-packages/gunicorn/arbiter.py”, line 589, in spawn_worker
p1monitor_1 | worker.init_process()
p1monitor_1 | File “/usr/local/lib/python3.7/dist-packages/gunicorn/workers/base.py”, line 134, in init_process
p1monitor_1 | self.load_wsgi()
p1monitor_1 | File “/usr/local/lib/python3.7/dist-packages/gunicorn/workers/base.py”, line 146, in load_wsgi
p1monitor_1 | self.wsgi = self.app.wsgi()
p1monitor_1 | File “/usr/local/lib/python3.7/dist-packages/gunicorn/app/base.py”, line 67, in wsgi
p1monitor_1 | self.callable = self.load()
p1monitor_1 | File “/usr/local/lib/python3.7/dist-packages/gunicorn/app/wsgiapp.py”, line 58, in load
p1monitor_1 | return self.load_wsgiapp()
p1monitor_1 | File “/usr/local/lib/python3.7/dist-packages/gunicorn/app/wsgiapp.py”, line 48, in load_wsgiapp
p1monitor_1 | return util.import_app(self.app_uri)
p1monitor_1 | File “/usr/local/lib/python3.7/dist-packages/gunicorn/util.py”, line 359, in import_app
p1monitor_1 | mod = importlib.import_module(module)
p1monitor_1 | File “/usr/lib/python3.7/importlib/__init__.py”, line 127, in import_module
p1monitor_1 | return _bootstrap._gcd_import(name[level:], package, level)
p1monitor_1 | File “”, line 1006, in _gcd_import
p1monitor_1 | File “”, line 983, in _find_and_load
p1monitor_1 | File “”, line 967, in _find_and_load_unlocked
p1monitor_1 | File “”, line 677, in _load_unlocked
p1monitor_1 | File “”, line 728, in exec_module
p1monitor_1 | File “”, line 219, in _call_with_frames_removed
p1monitor_1 | File “/p1mon/scripts/P1Api.py”, line 3, in
p1monitor_1 | import apiutil
p1monitor_1 | File “/p1mon/scripts/apiutil.py”, line 5, in
p1monitor_1 | import yaml
p1monitor_1 | ModuleNotFoundError: No module named ‘yaml’
p1monitor_1 | Traceback (most recent call last):
p1monitor_1 | File “/usr/local/lib/python3.7/dist-packages/gunicorn/arbiter.py”, line 209, in run
p1monitor_1 | self.sleep()
p1monitor_1 | File “/usr/local/lib/python3.7/dist-packages/gunicorn/arbiter.py”, line 357, in sleep
p1monitor_1 | ready = select.select([self.PIPE[0]], [], [], 1.0)
p1monitor_1 | File “/usr/local/lib/python3.7/dist-packages/gunicorn/arbiter.py”, line 242, in handle_chld
p1monitor_1 | self.reap_workers()
p1monitor_1 | File “/usr/local/lib/python3.7/dist-packages/gunicorn/arbiter.py”, line 525, in reap_workers
p1monitor_1 | raise HaltServer(reason, self.WORKER_BOOT_ERROR)
p1monitor_1 | gunicorn.errors.HaltServer:
p1monitor_1 |
p1monitor_1 | During handling of the above exception, another exception occurred:
p1monitor_1 |
p1monitor_1 | Traceback (most recent call last):
p1monitor_1 | File “/home/p1mon/.local/bin/gunicorn”, line 10, in
p1monitor_1 | sys.exit(run())
p1monitor_1 | File “/usr/local/lib/python3.7/dist-packages/gunicorn/app/wsgiapp.py”, line 67, in run
p1monitor_1 | WSGIApplication(“%(prog)s [OPTIONS] [APP_MODULE]”).run()
p1monitor_1 | File “/usr/local/lib/python3.7/dist-packages/gunicorn/app/base.py”, line 231, in run
p1monitor_1 | super().run()
p1monitor_1 | File “/usr/local/lib/python3.7/dist-packages/gunicorn/app/base.py”, line 72, in run
p1monitor_1 | Arbiter(self).run()
p1monitor_1 | File “/usr/local/lib/python3.7/dist-packages/gunicorn/arbiter.py”, line 229, in run
p1monitor_1 | self.halt(reason=inst.reason, exit_status=inst.exit_status)
p1monitor_1 | File “/usr/local/lib/python3.7/dist-packages/gunicorn/arbiter.py”, line 342, in halt
p1monitor_1 | self.stop()
p1monitor_1 | File “/usr/local/lib/python3.7/dist-packages/gunicorn/arbiter.py”, line 393, in stop
p1monitor_1 | time.sleep(0.1)
p1monitor_1 | File “/usr/local/lib/python3.7/dist-packages/gunicorn/arbiter.py”, line 242, in handle_chld
p1monitor_1 | self.reap_workers()
p1monitor_1 | File “/usr/local/lib/python3.7/dist-packages/gunicorn/arbiter.py”, line 525, in reap_workers
p1monitor_1 | raise HaltServer(reason, self.WORKER_BOOT_ERROR)
p1monitor_1 | gunicorn.errors.HaltServer:
p1monitor_1 | smbd: unrecognized service
Hallo GJ,
ik ga er naar kijken maar wat voor een systeem en OS gebruik je? Zodat ik kan gaan kijken wat er mis gaat?
Ik gebruik raspian op een raspberry pi, en docker-compose versie 1.29.2
Ik heb een wijziging aan gebracht in de image want blijkbaar ging er iets mis met bepaalde ARM bestanden. Probeer het eens met deze image tag zodat de nieuwe image gedownload wordt:
image: mclaassen/p1mon:rolling
Ik hoor graag wat het resultaat is
Hoi Marcel,
Yes, deze werkt prima, in 1 keer.
Dank voor je snelle hulp!.
Vanaf nu gebruik ik jouw docker.
Groet en een goed weekend.
Hoi Marcel,
Het enige wat me nog niet lukt is ook de watermeter erin te krijgen.
Op een of andere manier werkt dat niet.
Ik heb beide methodes geprobeerd.
Heb je daar toevallig nog tips voor?.
Groet.
Ik gebruik dat zelf niet (ik draai ook gewoon op een server) maar heb het even geprobeerd. Ik heb in de image iets aangepast (dus even een docker-compose pull doen voor de mclaassen/p1mon:rolling image) en als device toevoegen /dev/gpiomem zoals hieronder.
Privileged en de andere opties zijn dus niet nodig. Dit is mijn geteste configuratie. Ik hoor graag of dit werkt en kijk anders even in de logging van gpio en de watermeter
version: '3.8' services: p1monitor: hostname: p1mon image: mclaassen/p1mon:rolling ports: - 81:80 volumes: - ./alldata/data:/p1mon/data - ./alldata/usbdisk:/p1mon/mnt/usb - ./alldata/mnt/ramdisk:/p1mon/mnt/ramdisk tmpfs: - /run - /tmp devices: - /dev/ttyUSB0:/dev/ttyUSB0 - /dev/gpiomem:/dev/gpiomem restart: unless-stoppedHoi Marcel,
Heb je voorstel uitgevoerd, maar het werkt nog niet.
In de logfile kom ik wel een warning tegen, namelijk iets dat de GPIO pin niet te openen is.
2022-01-16 08:50:02,088,”INFO”,”init: gpioDigtalInput gelezen uit database, pin nummer is 17″
2022-01-16 08:49:32,059,”INFO”,”init: gpioDigtalInput gelezen uit database, pin nummer is 17″
2022-01-16 08:49:02,011,”WARNING”,”Main: GPIO pin voor watermeter niet te openen. 30″
2022-01-16 08:49:01,990,”INFO”,”init: gpioDigtalInput gelezen uit database, pin nummer is 17″
2022-01-16 08:49:01,974,”INFO”,”Main: database tabel watermeter succesvol geopend.”
2022-01-16 08:49:01,973,”INFO”,”Main: database tabel status succesvol geopend.”
2022-01-16 08:49:01,911,”INFO”,”Main: database tabel config succesvol geopend.”
2022-01-16 08:49:01,604,”INFO”,”Start van programma met process id 234″
Hoi Marcel,
Ben even verder aan het “pielen” gegaan 😉
Met privileged en die /sys werkt het nu wel, dus prima zou ik zeggen:
version: '3.8'
services:

  p1monitor:
    hostname: p1mon
    privileged: true
    image: mclaassen/p1mon:rolling
    ports:
      - 80:80
    volumes:
      - ./alldata/data:/p1mon/data
      - ./alldata/usbdisk:/p1mon/mnt/usb
      - ./alldata/mnt/ramdisk:/p1mon/mnt/ramdisk
      - /sys:/sys
    tmpfs:
      - /run
      - /tmp
    devices:
      - /dev/ttyUSB0:/dev/ttyUSB0
      - /dev/gpiomem:/dev/gpiomem
    restart: unless-stopped
Super dank voor je hulp, zo kan tie in ‘productie’ hier.
Groet
Ah mooi dat het werkt alhoewel toch met privileged mode. Ik ga ondertussen ook nog wel even kijken wat de verschillen precies zijn als je dat eventueel wilt vermijden.
Hi Marcel,
Ik gebruik nu ook een docker versie van p1mon, maar dan de https://github.com/rvleij/p1monitor.
met het volgende commando run ik die:
docker run -d -p 80:80 -p 10721:10721 -p 40721:40721 –name=”p1mon” \
-h p1mon –cap-add=SYS_NICE \
–tmpfs /tmp –tmpfs /run -v /p1mon/mnt/ramdisk:/p1mon/mnt/ramdisk:rw \
-v /opt/p1mon/data:/p1mon/data:rw -v /opt/p1mon/usbdisk:/p1mon/mnt/usb:rw \
-v /etc/localtime:/etc/localtime:ro \
-v /sys:/sys \
–privileged \
–device=/dev/ttyUSB0 \
–restart=unless-stopped \
rvleij/p1monitor
Ik heb namelijk GPIO nodig, om ook de watermeter via GPIO uit te lezen in p1mon.
Kan ik deze ook gebruiken met jouw docker versie?.
Groet,
Dat zou zeker moeten kunnen! Ik zie dat je nu de ‘privileged’ tag gebruikt en het volume sys mapped. Dat zou ook gewoon moeten werken als je deze settings in je docker-compose bestand plaatst.
Ik ben geen voorstander van privileged en zou liever proberen het device /dev/gpiomem gebruiken (eerste voorbeeld). Met privileged mode (2de voorbeeld)
Ik hoor graag wat werkt voor je!
met device map:
devices:
– “/dev/ttyUSB0:/dev/ttyUSB0”
– /dev/gpiomem:/dev/gpiomem
met privileged mode:
p1monitor:
hostname: p1mon
privileged: true
en hier:
volumes:
– /sys:/sys